Showing posts with label Asian Snacks. Show all posts

Roti Canai/Paratha Bread - Step by Step Recipes

One of the things I miss most here in the USA is the Mamak stalls. We like to go there for breakfast or for teh tarik (pull tea) in the evening. My friends and I can just sit there and talk till the wee hours in the morning. Sometimes I do miss that simplicity in life. Roti canai or roti paratha is a flat bread that is flip over and over until they become transparently thin before they fold them with lots of air bubble and ghee inside that when they pan fry it, it becomes light and crispy on the outside and slightly chewy and springy on the inside.

I might look easy to make but they are not. Each time I try to flip it, the dough will stick together and I get the oil all over the kitchen. I gave up and end up stretching the dough will my fingers. The roti canai came out ok. Not as thin and crispy as I wanted it to. I hope I will do a better job the next time I make this again. From now on please don’t take the Mamak roti canai for granted. It involves more hard work than you think ;)


Ingredients:
adapoted from Mamafami

500 grm flour
300 ml water
1 egg
1 tsp salt
2 tbsp condensed milk
1 tbsp margarine
Some vegetable oil

1. Dissolve salt and condensed milk in water. Beat in the egg. Add in the egg mixture to the flour, mix and knead until it forms into smooth soft dough. Leave it to rest for 30 minutes.

2. Divide the dough into 10-11 pieces. Roll it into balls and rub margarine over each ball. Keep the dough balls in a container and leave it to rest for at least 4 hours. Over night will be better.
3. Grease the work table with some vegetable oil. Press and flatten the balls of dough with your palm. Spread a bit of oil on the flatten dough.


4. With your palm and fingers, pull and stretch out dough as thin as possible. Be careful not to tear it especially in the middle because the tear will grow bigger as your stretch. Oil you dough and hands as you go along.


5. Bring the dough to the center to form long dough. If we can get air trapped in the thin sheet at this point, don’t press air out as it would give a lighter, fluffier result. Hold one end of the dough upwards and swirl it down to form a piece of swirly turban. Set it aside to rest for half an hour.


6. Heat up a non-stick pan with a bit of oil. Lightly flatten the dough again with your fingers and place the dough over low heat pan. Cook slowly on one side until golden brown, turn over the dough and cook over the other side until golden brown. Serve warm with some curry.

Note: Be careful when you work with the dough. It can't be re-kneaded or streached out again once you mess it up. You have to throw it away.

I am entering this post in the Muhibbah Malaysian Monday roundup, created and hosted by Sharon of Test with a Skewer and Suresh of 3 Hungry Tummies.

Bak Kua/Chinese Pork Jerky Recipes

This is another must have snack for Chinese New Year. Who doesn’t like Bak Kua? Maybe if you are a health nut than you might stay away from it. For me Chinese New Year is the time to indulge into all the sinful food, cookies and other luxury snacks that we don’t eat often. Bak Kua variously translated as dried meat, grilled Chinese Pork Jerky or BBQ meat slices.

Back in Malaysia you can get this jerky all year round but strangely, most people will eat this only during CNY. Many people are willing to queue for hours during this time of the year just to get their hands on the BBQ meat from their favorite store. My family is very picky over our bak kua. We only eat the bak kua from a certain store and it has to be lean and doesn’t have the rancid porky smell.


Living here I don’t have the luxury of eating Malaysia Bak Kua. I am able to buy them in New York but they do not taste good at all. They claimed to be made by Malaysian but it just doesn’t have the taste of the one from home. I tried making this once but it didn’t turn out too well either. It was too oily (because of the fatty ground pork) and the taste was out. I didn’t like it at all. So I stay away from making this for a few years.

I tried making it again this year by tweaking the recipe and lo and behold, it turns out really good. The meat was well marinate, a great balance of sweet and savory with a hint of fruity orange. I used mostly lean meat and I made everything in the oven. No more grilling it outside in the super cold winter. You should see me when I first made this. I was standing at the grill in my heavy winter clothing. My neighbors must be thinking this woman was MAD ha ha… If you want a healthier bak kua with no chemicals and preservatives why not try to make it at home. Since this bak Kua has no preservatives, try to consume it within a few days. I don’t recommend you make too much of it at one time unless you want to give it away to family and friends. These keeps well in the fridge and just reheat it in the toaster oven before consuming.


Ingredients:

2 pounds ground pork –with a bit of fat on it
2 tbsp fish sauce
3 tbsp soy sauce
1 tsp dark soy sauce
2 tbsp Chinese cooking wine
3/4 cup sugar
3 tbsp dark brown sugar
Juice of half orange (about 4 tbsp)
Zest of one orange


1. Line 2 baking pan with heavy aluminum foil and set it aside.
2. Put all the ingredients in a large mixing bowl. Using a big spoon mix it really well. Cover with plastic wrap and let it marinate in the fridge for an hour.
3. Pre-heat the oven to 220 degree F. Spread the marinate meat thinly onto the baking sheets. Use a spatula or the back of the spoon to do this and dipping it in water occasionally. This way it will prevent the meat from sticking to the spoon or spatula.
4. Place the baking pan in the oven and let it bake slowly for 35-40 minutes. At this stage you can see juices appear, the meat will shrink and the edges dry out.
5. Remove from oven and cool it down a bit and cut it into square with pizza cutter or scissors. Turn the oven to broil.
6. Line the cut meat back on the tray. Broil the meat on both side until brown and sizzle . This will only take 5-6 minutes (you have to watch this as it turn dark pretty fast)
7. Let it cool and keep it in an air-tight container.


Note: I put a bit too much of black soy sauce that is why the bak kua look a bit dark. I already adjust the quantity of the black soy sauce in the recipe. If you like to grill this, you can do so. Just cut and grill it after step 5.

Chinese Peanuts and Sesame Candy Bars Recipes

I grew up eating this peanut candy and it is Carlos favorite snacks too. This candy is something that we will have on our CNY snack tray too. I Google for it and the only recipe I find is from Aunty Lily’s so I used hers. Here is a note to myself the next time I am making this again. Do not talk on the phone while making this!! The phone rang when this was cooling down and by the time I hang up the phone, the candy got way too hard when I tried cutting it so I end up breaking most of it. That is why you see the ugly pieces here. I am submitting this cookie to Aspiring-Bakers # 3 My Favourite CNY Cookies hosted by j3ss kitch3n

Ingredients:
Recipe adapted from Aunty Lily’s

1 cup sugar
2 tbsp white vinegar
1 tbsp water
1/4 cup toasted sesame seeds
2 1/4 cups skinless roasted peanuts


1. Line a 6 ½" x 10" cake pan with foil and greased it generously with oil. Combined half of the toasted sesame seeds and peanuts together and lay it evenly on the pan.
2. Combine sugar, vinegar and water in a heavy bottom saucepan. Cook over medium heat until it reaches 300° F on a candy thermometer. (I just let it reach to light brown color stage)
3. When the sugar mixture has reached the required temperature, carefully pour the sugar mixture over the nuts in the baking pan.
4. Smooth the surface with a spatula. Sprinkle with the remaining sesame seeds and cool slightly.
5. While candy is still warm, remove from pan by lifting the foil. Cut into 2" by 1" pieces and then allow to cool completely.


Note: Be careful when you eat this as they are very hard.

Kaya Balls/Coconut Jam Balls Recipes

I always wanted an electric Takoyaki pan but can’t bring myself to buy it because it cost way too much money for a small gadget. I was so happy when Diana gave me that for Christmas. I promise her that we will make Takoyaki together when she comes home the next time. In the meantime I can’t just let the pan sitting in the kitchen counter without making anything out of it so I decided to try my hand in making Kaya Balls.

These little bite sized delights are commonly sold in Malaysia shopping center food courts. . They are basically little dome-shaped buns filled with kaya (coconut egg jam), chocolate or peanut butter. I tried goggling for the recipe but can’t seem to find the one I want. So this recipe is something I come up with and it turn out pretty good.


Ingredients:

150 gram cake flour
30 gram cornstarch
1 tbsp custard powder
70 gram sugar
1 tsp baking powder
¼ tsp salt
2 eggs
180 ml milk
1 tsp vanilla
2 tbsp oil
5 tbsp kaya/coconut jam
Some oil for greasing

1. Combined flour, cornstarch, custard powder, salt and baking powder. Mix well and set it aside.
2. Whisk eggs and sugar until well corporate, add in the milk and stir well. Stir in the flour mixture until you get a smooth batter. Add in the vanilla and oil. Set the batter aside to rest for half an hour.
3. Pour the batter into measuring cup for easy pouring. Turn on the Takoyaki pan; brush it lightly with some oil. Pour some batter into each holes about ¾ full, add a little dollop of kaya in the middle of the batter.


4. Once bubbles appear on top of the balls and the bottoms are lightly brown, use a wooden skewer and flip the balls over to cook the other side.
5. Once it is brown, remove the balls and transfer it to serving plate. Repeat the same to the rest of the batter.


Note: This Takoyaki pan does not come with a heat control, so I burned the very first batch of the batter. I have to switch on and off a few times just to control the heat.

I am entering this post in the Muhibbah Malaysian Monday roundup, created and hosted by Sharon of Test with a Skewer and Suresh of 3 Hungry Tummies.

Crispy, Sweet and Sticky Chicken Wings Recipes

Who doesn’t like chicken wings? I for one am crazy over it. These crispy, sweet and sticky wings are addictive. The hint of ginger and a bit of chili flakes compliments really well with the wings. This was indeed a finger licking good. Even Carlos who is not a big fan of wings ate a whole lot of it. If you like wings do give this recipe a try and I am sure you will not be disappointed.

Ingredients:

12 chicken wings – clean, cut and tips removed

Marinate for the wings:

1 tbsp of ginger juice
3/4 tsp salt
½ tsp pepper

Coating:

1 egg
3 tbsp flour
2 tbsp cornstarch


Sweet Sauce

½ cup water
3 tbsp brown sugar
2 tbsp honey
1 tsp grated ginger
2 tbsp soy sauce
1 tbsp rice vinegar
Some chili flakes
Some toasted sesame for garnish


1. Marinate the chicken wings for at least 2 hours. Combined both flour and mix well. Add in the beaten egg to the wings follows by the flour. Mix it with your hand until they’re thoroughly coated.
2. Heat up some oil and deep fry the wings over medium high heat in two batches (do not overcrowd it or else you wings won’t be crispy) until golden brown. Remove and drain well on paper towel.
3. In another large pan, combined water, sugar, honey, soy sauce, ginger and vinegar. Bring it up to a boil and cook until the mixture becomes thick and syrupy or until it started to foam (it should be thick like honey)
4. Turn off the heat; add in the fried wings, sesame seeds and chili flakes. Stir and toss until the sauce completely coated the wings. Serve warm or at room temperature.

Korean Pancakes/Pajeon Recipes

Diana gave me a big bag of Korean pancake mix and it had been sitting in my pantry for a while now. I finally decided to try my hand in making Korean pancakes/Pa jeon. This pancake is very simple to make. All you have to do is mix the flour with some water; add in your favorite veggies like carrots, green onions, cabbage, mushrooms and any kind of seafood of your choice. You can omit the seafood for a vegetarian version.

Ingredients:

3/4 cup Korean pancake mix
1 cup water
12 shrimps - peeled, deveined, and roughly chopped
1 small carrot, grated
1 cup grated cabbage
3 green onions, thinly sliced
5 button mushrooms – thinly sliced
salt and pepper to taste


Dipping sauce:

3 tbsp Sriracha chili sauce
2 tbsp vinegar
1 tbsp sugar


1. In a large bowl add the pancake mix, salt and pepper. Whisk to combine. Add the water and whisk until smooth. If the batter is looking too thick, add a little more water. The consistency should be like heavy cream, not too watery. Add in the chopped seafood (if using), all the vegetables and mix well.
2. Heat a tbsp of vegetable oil in a nonstick pan over medium high heat. Ladle about 1/3 of the batter into the pan and spread it evenly in the pan. Cook until the bottom is crisp and golden brown. Flip and cook on the other side until golden brown. Repeat with the rest of the batter.
3. Cut the pancakes into wedges and serve with dipping sauce.
4. For the spicy dipping sauce, mix all the sauce ingredients together.


Note: Adjust the spiciness of the dipping sauce according to your own taste.

Blue Glutinous Rice Cakes (Pulut Tai Tai) Recipes

I always wanted to make this Chinese Baba Nyonya wedding specialty cakes. It is called Pulut Tai Tai or Blue Glutinous Rice Cakes. The blue stain comes from a flower name Bunga Telang or Blue Pea Flower. Since I still have some of the dried blue pea flowers given by Sonia I decided to made some when my friend Choy’s and her family came to our house for dinner not too long ago Traditionally, this cakes are served with kaya (coconut egg jam) and you can find the recipe here.

Ingredients:

600g glutinous rice – wash and soak overnight
350 ml coconut milk
150ml warm water
4 pandan leaves
1 tsp salt
2 tbsp sugar
12 - 15 blue pea flowers – soak in some warm water,crush it to extract the blue coloring.

1. Wash the rice and divide it into two equal portions. Soak one part in water and another part in the blue pea flowers juice. Leave them overnight. Soaking the rice overnight will help in steaming process.
2. Drain both the rice; put them side by side on into a steaming tray. Warm the coconut milk, sugar and salt into the microwave for 30 seconds. Stir and mix well.

3. Drizzle in about half of the coconut milk into the rice. Arrange the pandan leaves on top of the rice and steam the rice over rapid boiling water for 10 minutes.
4. Remove the steaming tray, put the pandan leave aside, fluff up and mix both rice together and drizzle the balance of the coconut milk, put the pandan leaves back on top of the rice again and continue to steam for another 15 minutes or until the rice is done.
5. Remove the steaming tray; discard the pandan leaves, even out the rice with a spoon, and using a banana leaf or aluminum foil press down the rice until well compact.
6. If possible put something heavy (I used can food) to weigh down the rice. Leave it to cool.
7. Slice the rice cakes and serve it with coconut jam.


I am submitting this dish to Muhibbah Malaysia Monday
For more details please refer here

Seri Muka II/Glutinous Rice Layer Cake Recipes

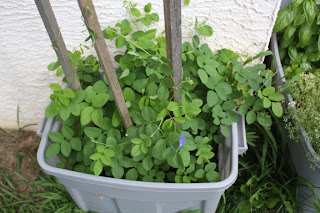
I’ve posted this before but it is a different recipe. I did some changes to the recipe and also tinted the glutinous with some bunga telang(butterfly pea or clitorea ternated) given to me by Sonia when I went back to Malaysia early this year. This flower which was used to blue the rice in nasi kerabu (rice salad) or nyonya kueh but now many of them just used the blue coloring. To obtain the color from the bunga telang, the blooms are dried in the sun before storing. When required, they are soaked in water to allow the color to seep out and subsequently, obtain the rich blue color. My friend Sue given me some seeds and I planted it during summer. I think I planted it a bit too late and by the time it started to flower it was already late summer so I didn’t get much flowers out of it. I kept quite a bit of seeds for my next season planting.


No sure why but the plants have more leaves than flowers.


Ingredients:

600 gram glutinous rice - wash and soaks the rice overnight
300 ml thick coconut milk
1 tsp salt
10 dried bunga telang/blue clitorea flower (soak in a bit of hot water, mash and squeeze it to extract a deep dark blue hue)


Custard topping:

3 eggs
130 gram sugar
3 tbsp custard powder
2 tbsp flour
300 ml thick coconut milk


1. To make the rice layer – drain the rice well. Combined the rice, coconut milk and rice and mix well. Pour it into a well greased 8” x 8” pan and steam over high heat for 30 minutes or until rice is cooked.
2. Remove from heat, fluff up the rice with a fork and drizzle the blue flower juice all over the rice. Press the rice with a banana leaf or aluminum foil to compact and level the surface. Set it aside.
3. To make the custard layer, combined all the ingredients and mix well. Strain into a saucepan to remove any lumps. Cook over low heat, keep stirring until mixture slightly thickens. Remove from heat and pour the mixture over the glutinous rice. Cover the top of the pan with a piece of foil and steam it over medium heat for 30 minutes.
4. Remove from heat and let it cool complete before cutting into it.

Note: To get a smooth and even top layer you have to steam it over medium heat and if not you will get bumpy and wrinkle layer. I do have some extra seeds for this flower and if anyone interested and you can email me your name and address and I will mail it to you.

I am submitting this dish to Muhibbah Malaysia Monday
For more details please refer here

Corn Fritters Recipes

I made these sometime ago when corns were at their peak during summer. I will usually grill or boil it but this time I made some fritters out of it. I used a bit of oil to pan fried them in a non stick pan and it turn out more like a pancakes. The fritters were crispy on the edges and tender in the middle. We had this with my homemade chili sauce.

Ingredients:

2 cups corn kernels
1/2 cup chopped shrimps
1 egg
1/2 cup flour
1/4 cup cornmeal
1 small onion
¼ cup chopped cilantro
4 spring onions – chopped
2 red chilies – chopped
½ tsp baking powder
¼ tsp turmeric powder
Salt and pepper to taste
enough water to hold the batter together


1. Put one cup of corn kernels, shrimps, and onions in a food processor. Give it a few pulses until all ingredients are roughly chopped. Remove to a mixing bowl.
2. Add in all the rest of the ingredients and mix well. Set it aside to rest for 15 minutes.
3. Heat up some vegetable oil (just enough oil) to coat the bottom of a non stick frying pan. Drop 1 tbsp of batter into the pan. Fry both side of the fritters until golden brown (about 2 minute per side).
4. Transfer fritters to paper towels to drain the oil. Serve immediately with some chili sauce.

Prawn Fritter/Cucur Udang Recipes

This is one of the favorite tea time snacks in Malaysia and you can usually find stalls selling them by road side stall in the afternoon or at the night market. This is something so readily available back home and I don’t usually make them. But here in the US when craving strike I have to make it myself. The last time I made this was in 2007 when my sisters came to visit us so it is time to make some for my evening tea and keep some for my mee rebus.


Ingredients:

1 cup flour
1/2 cup tempura flour/mix
1/2 tsp baking powder
1 1/4cups water (the amount of water depend on how thick you like the batter to be)
Small bunch Chinese chives – cut into 1” length
1 cup of bean sprouts
1 tsp chicken granules
½ tsp turmeric powder
Salt and pepper to taste
20 medium size shrimps/prawns – clean and leave the head and tail intact
Oil for frying


1. Combine the flour, tempura flour, baking powder, turmeric, chicken granules and salt into a mixing bowl. Add water and mix it with a spoon to make a fairly thick batter. Leave the batter aside to rest for 15 minutes. Then stir in the chives and bean sprouts.
2. Heat the oil for deep frying over medium heat. Place a medium size ladle in the oil to and heat it for 2 minutes. Remove the ladle from the oil and allowing excess oil to drip off.
3. Spoon enough batter to fill the ladle almost to the top and press a prawn into the center of the batter and gently lower the ladle into the oil.
4. After 2 to 3 minutes, when the base of the fritter has formed a crust, gently loosen the out the fritter from ladle by using small knife and allow it to continue frying until golden brown.
5. Refill the ladle with more batter and continue until all the batter is used up.
6. Remove fritters and drain the oil on paper towel. Allow the fritters to cool down before cutting it into cubes and serve with some chili sauce.

I am submitting this dish to Muhibbah Malaysia Monday
For more details please refer here