Pizza Cups Recipes

I received some cheese sample from Marcus of Ile De France and Carlos absolutely loved it. I didn’t nickname his Cheese Monster for nothing. He just loves his cheeses. I am actually pretty familiar with Ile De France cheeses as I am able to get from the supermarkets here but if you can’t you can always get in online. Ile de France Cheese has been importing gourmet French brie, goat cheese and camembert since 1936. They were the first importer of French brie to the United States. The company uses the Ile de France name to promote Ile de France brand cheeses as well as other types of gourmet-quality French cheese that are sold under different labels and owned by the same parent company.


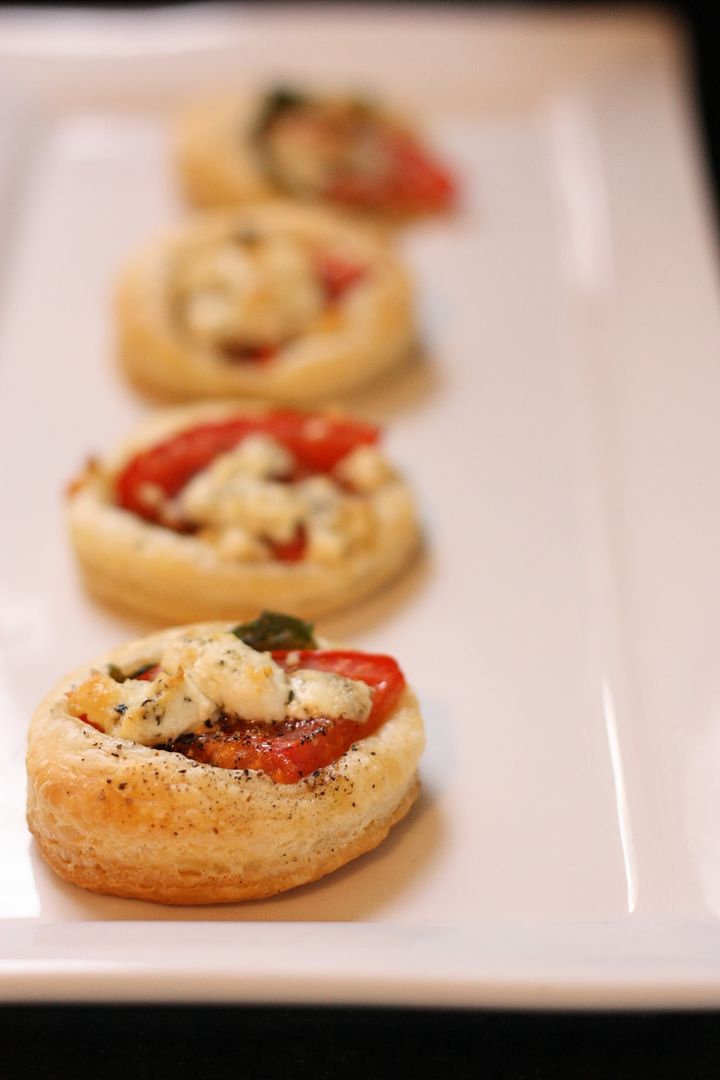
Besides eating the cheeses with fresh fruits and crackers I used some of the Brie cheese to make these Pizza Cups. I just love the gooey and oozy brie when they just came out of the oven. They are simply divine. What a great alternative to the usual mozzarella cheese.

Pizza dough ingredients:

1 packet/7 gram dry yeast
¾ cups of warm water – about 110 degree F
2 cups + 2 tbsp of bread flour
2 tbsp olive oil
1 tsp salt
2 tsp sugar

For Filling:

1 cup of cooked chicken (I used leftover roast chicken)
1/4 cup olives – sliced small
½ small onion – cut into small cubes
1 cup marinara sauce
Pepper to taste
½ cup grated cheddar
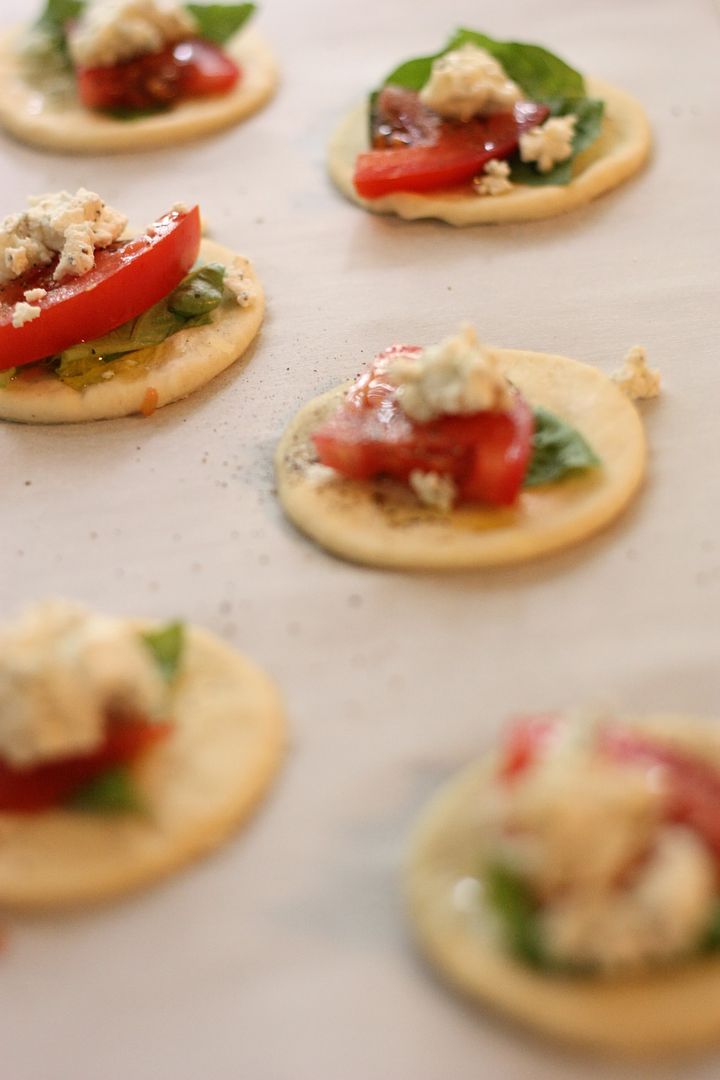
Some sliced Brie for topping
Some sliced basil for garnish

1. Dissolve the yeast and sugar in the warm water. Let it stand about 10 minutes or until frothy.
2. In a large bowl combined the flour, olive oil and salt. Stir in the yeast mixture into the flour mixture. Knead it into smooth dough. (you might need to add another 2 tbsp of flour to it). Cover and let it rise to double in volume.
3. In the meantime, combined cooked chicken, olives, onions, cheddar, pepper and marinara sauce in a mixing bowl. Mix well.
4. Get ready a muffin pan. Greased with some melted butter. In a working table, dust with some flour. Roll out the pizza dough and cut out the dough to fit into your muffin pan.
5. Fill it up with the fillings, and top it with a slice of brie. Bake in a pre-heated 375 degree oven until the pizza cups are bubbly and brown. Garnish it with some basil. Let the pizza cups cool down a bit on the muffin pan before removing it. Serve warm or at room temperature.

P/s You can replace the cooked chicken with any type of protein and so is the cheese.

Blueberry scones - Dairy Foods


I made blueberry scones last weekend for a lovely brunch I had with two girlfriends. I adore weekends where there is time in the morning to bake muffins or scones. There is something so warm and comforting about sitting down to a lazy breakfast.

I've come to realize how important/helpful it is to read reviews of recipes. These scones were very good, but I made a few modifications based on what I read in the reviews. I've incorporated those changes in the recipe below. The scones were by no means perfect, for some reason they came out a bit flatter than I would have liked, but were still very moist and tasted great.


Blueberry Scones (adapted from All Recipes)

Ingredients
2 cups all-purpose flour
1/4 cup packed brown sugar
1/4 cup white sugar
1 tablespoon baking powder
1/4 teaspoon salt
1/4 cup butter, chilled
1 cup fresh blueberries
3/4 cup half-and-half cream
1 egg
1 teaspoon vanilla extract
1 teaspoon lemon zest (optional)

Directions
1.Preheat oven to 375 degrees F (190 degrees C).
2.Cut butter into mixture of flour, sugar, baking powder, lemon zest and salt. Add blueberries and toss to mix.
3.In separate bowl beat together cream, vanilla and egg, and slowly pour into dry ingredients, stirring with rubber scraper until dough/batter forms.
4.Using the drop method, drop heaping spoonfuls on to a greased and lightly floured cookie shoot and sprinkle tops with sugar.
5.Bake on ungreased sheet about 20 minutes at 375 degrees F (190 degrees C). Serve warm!!

The original recipe called for kneading the dough and on a lightly floured board, shape each half into a 6-inch round then cut into 6 wedges. The reviews all said the batter was too wet to be handled which is why the drop method is recommended. I also found the batter to very very wet. I supposed this could also be handled by adding more flour.

I hope you all have a wonderful Memorial Day weekend! Mine will be spent at a cabin with friends, then a date night with my honey and having my family over on Monday. The weather in MN couldn't be more perfect! What are your plans?

Black and White Jelly Recipes

Summer is just around the corner and we are having over 90’s degree temperature. Man, it is warm. I just hide inside the house most of the time and if I need to go out to run errand I will go out really early and be back home by noon. Even though I grew up in a tropical country but I still can’t stand the heat. I will stay indoor in an A/C room most of the time. In the heat like this it is nice to have something cooling like grass jelly. In Malaysia we usually eat this type of grass jelly with syrup or mix it with soy bean milk. I made this little cute dessert with both the grass jelly and soy bean milk.

Ingredients:

15 grm of agar agar powder
1000 ml unsweetened soy bean milk
¾ cup sugar ( more if you like it sweeter )
1 can/500 grm grass jelly (cut into small cubes or roughly grated into long strand)
3 pandan leaves


Grass Jelly
1. In a saucepan, bring soy bean milk, agar agar powder and pandan leaves to a slow boil. Make sure you stir the mixture all the time until the agar agar dissolves.
2. Remove the pandan leaves and add in the sugar. Stir until the sugar dissolves. Taste and see if you like the amount of sweetness.
3. Add in the grass jelly. Pour the mixture in a tray or jelly mould of your choice. Chilled until firm before serving.

Recipe index and more... - Dairy Foods

I am taking a break from a regular post today because I am working on a recipe index for the blog. The index will help you find recipes faster and will hopefully provide some inspiration for you in the kitchen!

I am about a third of the way done with the index and this project has made me realize that I bake way too many cupcakes and there is no question where the extra few pounds have come from over the past year.  I hope you enjoy the recipe index, it will be complete early next week.

Also, I received the Eat Drink Pretty dessert table photos from Sewell Photography yesterday! The photos are gorgeous and I can't wait to post them (sometime within the next week or so...)

Thanks so much for stopping by Eat Drink Pretty!

Recipe index - Dairy Foods

Appetizers/Starters  

Bread
Breakfast

 Dessert
Drinks

 Indian

 Main Course

 Salad

 Side Dish

 Soup

Chicken with Spices Recipes

Do you ever have problem deciding what to cook for lunch or dinner? I always do. This is what I normally do. I will see what meat I want to cook for that day. Then from there I will check what I have in the vegetable compartment. Then from there I will come up with something. This dish was one of them. I just take a few ingredients, blend it, marinate it and cook it and voila!! A delicious dish for our dinner for that day.

Ingredients:
Half chicken – cut into bite size piece
Salt and sugar to taste

Blended ingredients:

1” fresh ginger
3 shallots
5 cloves garlic
2 red chilies
2 pieces fresh turmeric or 1 tbsp turmeric powder
2 tbsp of curry powder
1 tsp cumin powder
1 tsp coriander powder

1. Put all the blended ingredients in a blender and blend it into a fine paste. Put it into the cut chicken and marinate it for at least an hour.
2. Heat up about 4 tbsp of oil in a wok over medium heat, put in the chicken, spread it out in the wok and then cover it. Turn and stir the chicken occasionally so that it didn’t burn. Add in some salt and sugar to taste.
3. Once the chicken is cooked dish it out and serves with some warm rice.

Note: I didn’t add any water to this dish. It turns out pretty much like dry chicken rendang minus the coconut milk and kerisik.

Chicken enchiladas - Dairy Foods


Now that there is daylight until later in the evening, I can photograph some of the delicious meals I've been making for dinner! The other week I made chicken enchiladas adapted from a Tyler Florence/Food Network recipe. These enchiladas were really good but I did make some minor modifications to the recipe.  I added 6 chipotle chiles instead of 4 (add even more if you like it spicy!) and next time I would probably omit the corn. I am not a huge fan of savory and sweet combined and the corn gave the enchiladas a bit of a sweetness.

Chicken Enchiladas (adapted from Food Network)

Ingredients

3 tablespoons vegetable oil
1 1/2 pounds skinless boneless chicken breast
Salt and pepper
2 teaspoons cumin powder
2 teaspoons garlic powder
1 teaspoon Mexican Spice Blend
1 red onion, chopped
2 cloves garlic, minced
1 cup frozen corn, thawed
5 canned whole green chiles, seeded and coarsely chopped
4 canned chipotle chiles, seeded and minced
1 (28-ounce) can stewed tomatoes
1/2 teaspoon all-purpose flour
16 corn tortillas
1 1/2 cups enchilada sauce, canned
1 cup shredded Cheddar and Jack cheeses

Garnish: chopped cilantro leaves, chopped scallions, sour cream, chopped tomatoes

Directions

Coat large saute pan with oil. Season chicken with salt and pepper. Brown chicken over medium heat, allow 7 minutes each side or until no longer pink. Sprinkle chicken with cumin, garlic powder and Mexican spices before turning. Remove chicken to a platter, allow to cool.

Saute onion and garlic in chicken drippings until tender. Add corn and chiles. Stir well to combine. Add canned tomatoes, saute 1 minute.

Pull chicken breasts apart by hand into shredded strips. Add shredded chicken to saute pan, combine with vegetables. Dust the mixture with flour to help set.

Microwave tortillas on high for 30 seconds. This softens them and makes them more pliable. Coat the bottom of 2 (13 by 9-inch) pans with a ladle of enchilada sauce. Using a large shallow bowl, dip each tortilla in enchilada sauce to lightly coat. Spoon 1/4 cup chicken mixture in each tortilla. Fold over filling, place 8 enchiladas in each pan with seam side down. Top with remaining enchilada sauce and cheese.

Bake for 15 minutes in a preheated 350 degree F oven until cheese melts. Garnish with cilantro, scallion, sour cream and chopped tomatoes before serving. Serve with Spanish rice and beans.

Do you have a good enchilada recipe that you can share?  Comment on this post or send an email to eatdrinkpretty@gmail.com

Love shoot: Kimber and Chas - Dairy Foods

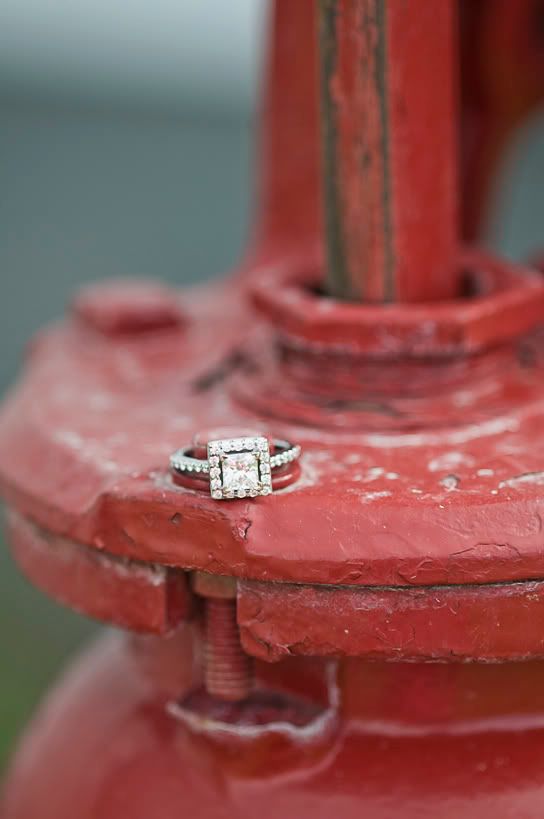
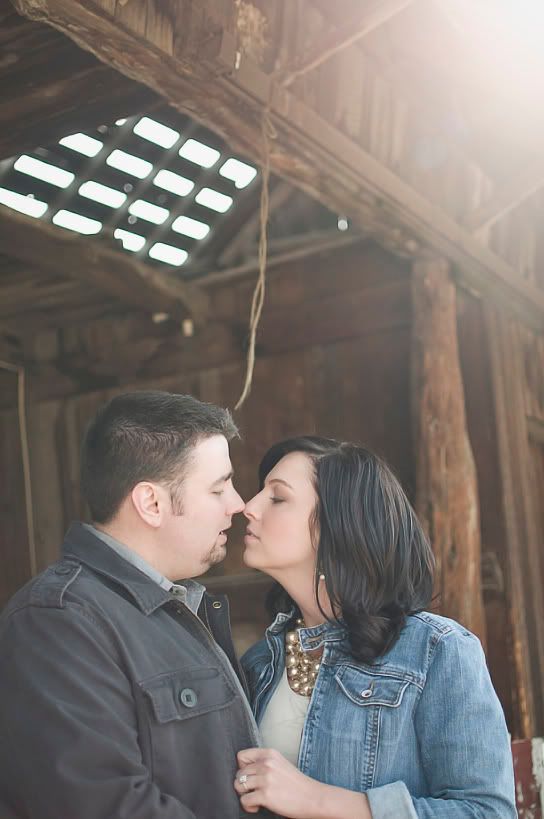
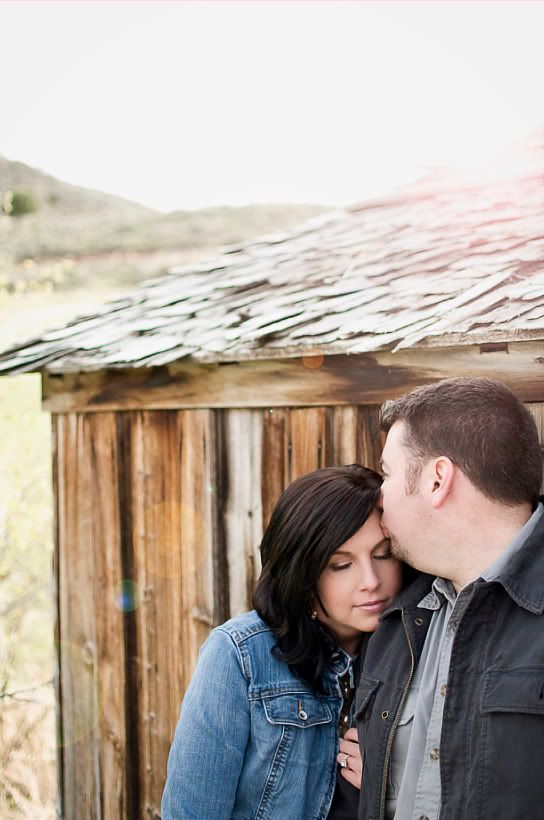
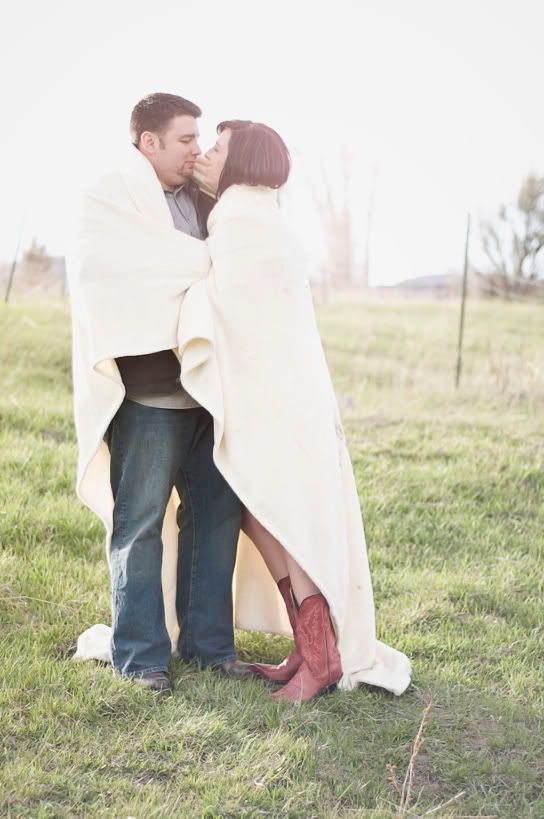
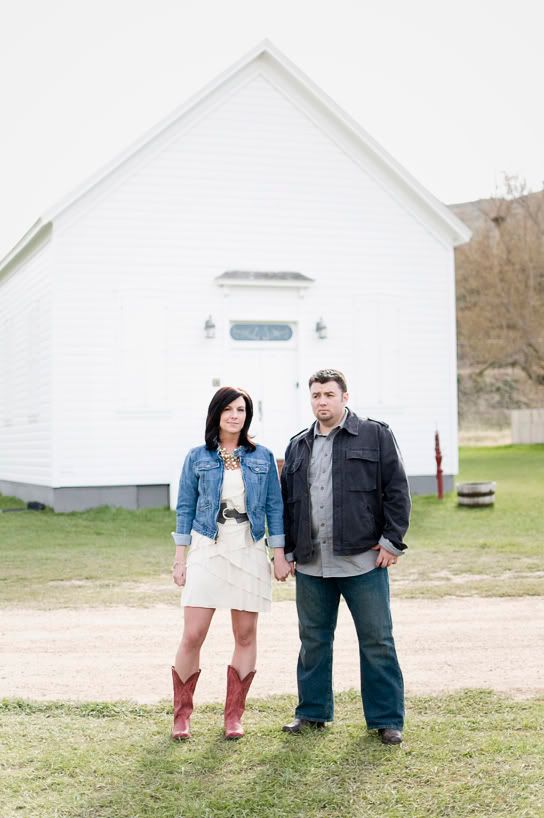
I have a super sweet engagement shoot to share today sent by Melissa Oholendt Photography. Melissa just celebrated the one year anniversary of her photography business yesterday and I have a feeling there are many successful years to come.

This engagement sessions is sweet, soft and completely lovely.  A little about they couple; they met singing on a church praise team and decided to form a band together and fell in love. So sweet!  The shoot took place near Park City, Utah.

Isn't the lighting amazing??


This one is my favorite.  Which one is yours? 

Thanks to Melissa Oholendt Photography for sharing this shoot with us!

Japanese-Style Sweet Bun Dough Recipes

I’ve tried quite a few Water Roux/Tang Zhong methods for making cotton soft sweet bread but by far I think this is the best one. It produces super soft bread and I stay that way for a few days. This time I tried out the recipe from Corner Café website. This is the recipe for basic sweet dough and from the dough you can fill it with all kinds of sweet and savory fillings. This is my simplified method of making the dough but do refer to Corner Café website for his details version.


Ingredients:Makes 16 buns

375g bread flour
100g plain flour
35g milk powder
75g caster sugar
3/4 teaspoon salt
1 sachet (7g or 2 1/2 tsp) instant dry yeast
1 egg, lightly beaten
150ml (approx.) lukewarm water – adjust according (I need only 130 ml)
40g butter, cubed

1 egg + a bit of water (for egg wash the buns)


Super soft buns
Water-Roux Paste/Tang Zhong:
25g (just under 2 tbsp) bread flour
125ml (1/2 cup) water

Preparation for the Water-Roux

1. Mix the flour and water in a small saucepan. . Cook over low to medium heat, stirring continuously until it reaches 65ºC. It should have thickened to a paste at this stage, which is when you stir you can see the bottom of the pan. Remove from heat; place a cling film over the paste and leave until lukewarm, or room temperature, before using. (Alternatively if you don’t have a thermometer, cook as before until it starts to thicken, then continue to cook for about 1 more minute before removing from heat.)

Note: This water roux can be kept in an airtight container after cooling in the refrigerator for 1 day if not used immediately. However DO NOT USE if it turns grey in color, that means it has gone bad.

Preparation for the dough:

1. Fit the mixer with the dough hook attachment. Sift bread flour, plain flour, milk powder, caster sugar and salt the mixing bowl. Add in the yeast and mix well. Add in the water roux and beaten egg. Turn on the mixer and slowly add in the lukewarm water until the dough form into a nice ball of dough. (You might not need all the water. I used only 130 ml of it)
2. Continue to knead for 10 minutes and add in the butter. Continue to knead until all the butter is incorporated into the dough and the dough is smooth and elastic. Take the dough out from the mixing bowl and give it a final few kneading by hand. Form it into a round ball and let it to rise until double in size in a large greased bowl. Cover the bowl with a wet towel or cling wrap (It took me an hour to proof the dough but it all depend on the weather and environment on the day you make the bread)
3. Punch down the dough gives it a few knead and divide the dough into 16 equal portions. The easiest way to divide is to cut the dough into 4 parts and from there divide each into another 4 portions. Form each into a ball and let it rest for another 10 minutes.
4. Shape and fill the buns with fillings. Place the buns in baking sheets that line with parchment paper. Cover the buns and let it rise until double in size (it takes another 30-40 min) Brush the buns with some egg wash.
5. Bake in a pre-heated 350 degree for 15-20 minutes or until golden brown.


I am submitting this to Yeastspotting

Cupcakes in nut/souffle cups - Dairy Foods

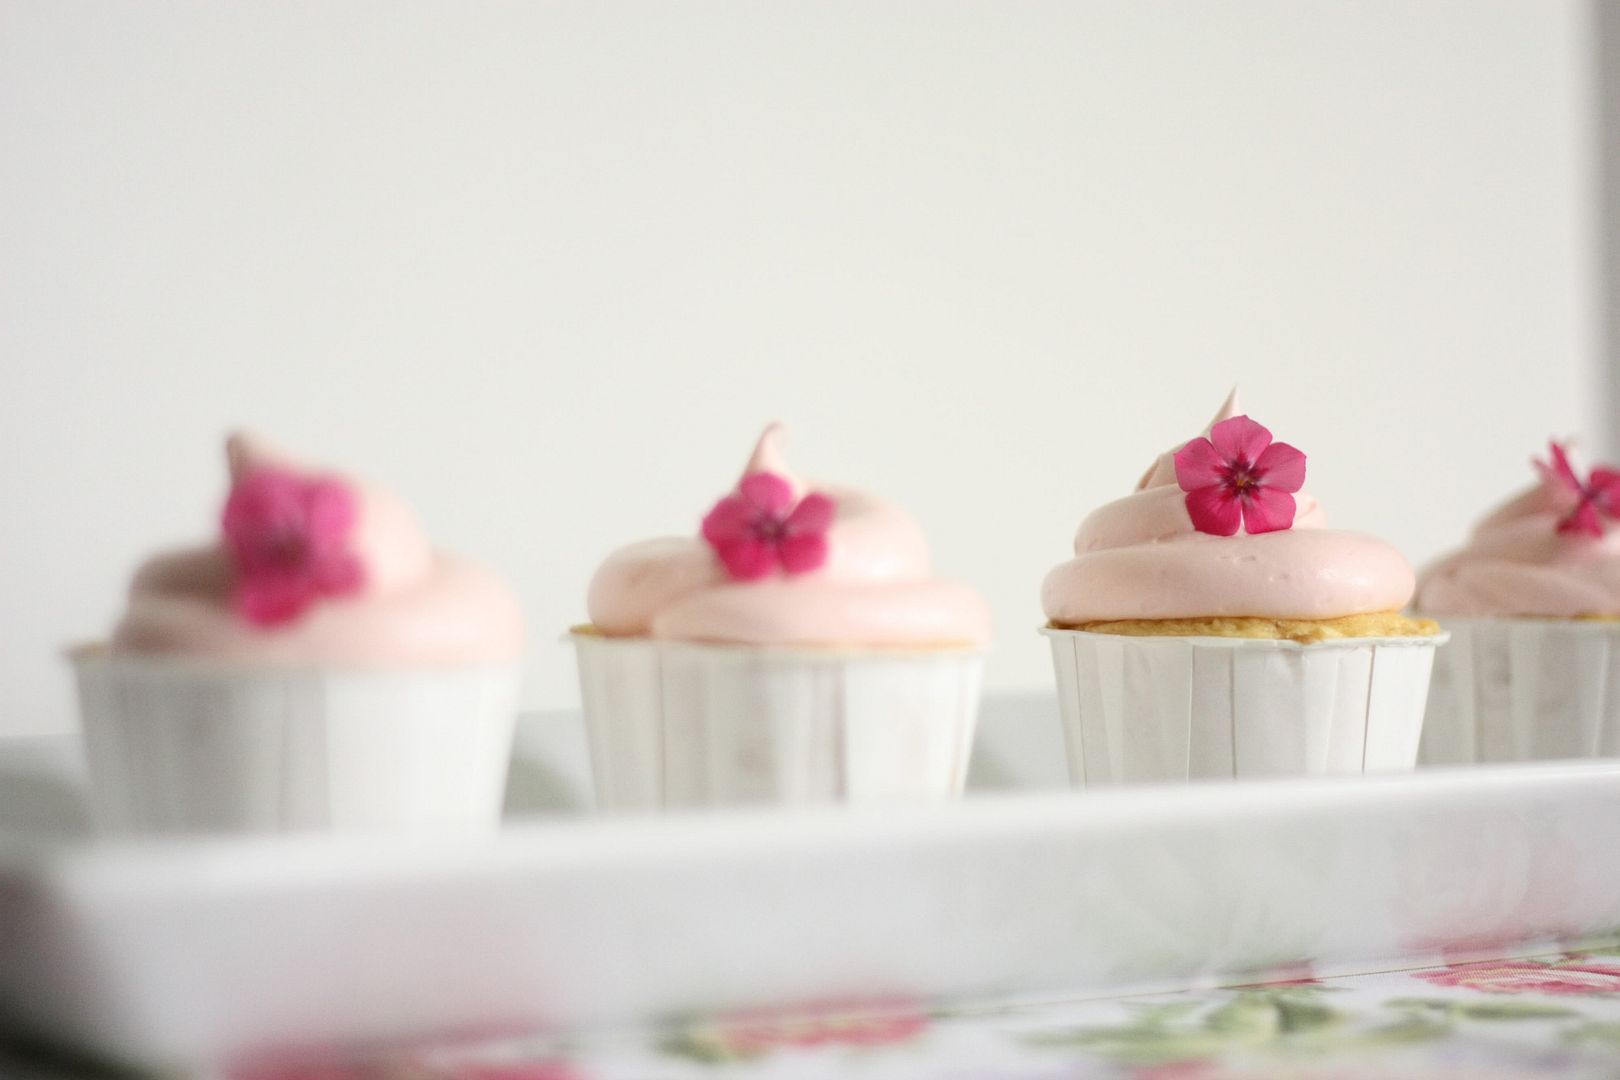
I baked these cute cupcakes in nut/souffle cups over the weekend. My sister and I picked up the cups at Michaels while shopping for items for her upcoming wedding. (The cupcakes and frosting were made from a mix and store-bought frosting, big time cheating. Oh well.)

I was mostly interested in figuring out how to bake cupcakes using these cups instead of cupcake liners. A muffin pan is not necessary, you simply put the cupcakes on a baking sheet and fill up 2/3 full.

One note, these don't peel away easily like cupcake liners. You either have to eat these cupcakes with a fork, or cut the cup using a scissors.


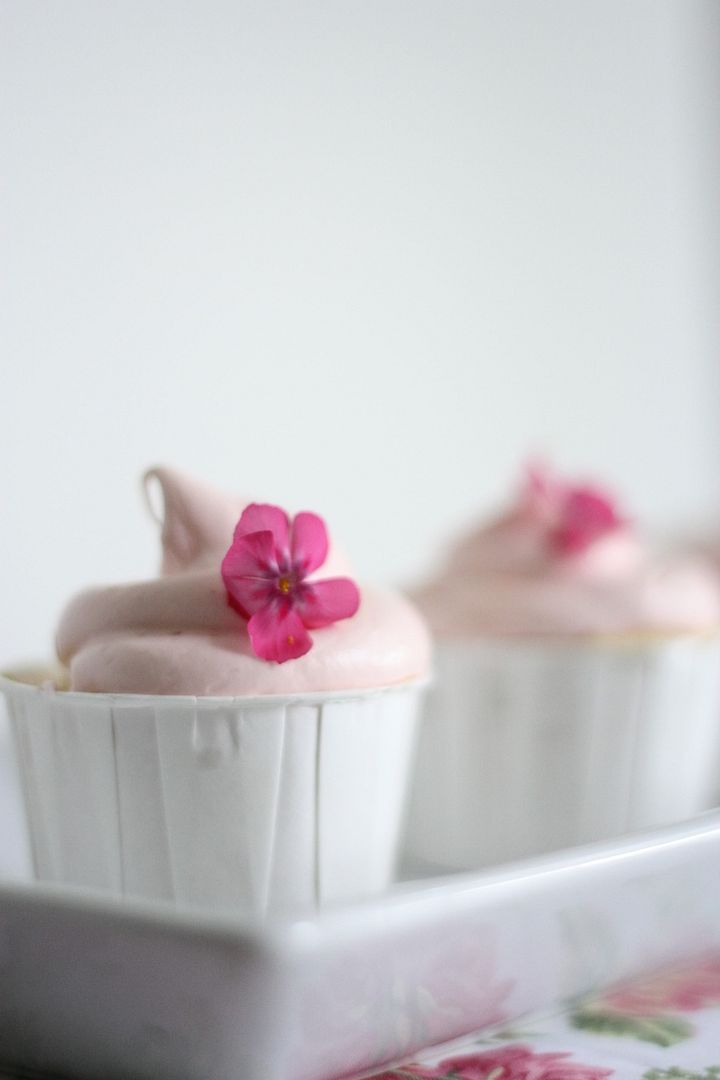
I piped the frosting using a large round tip.


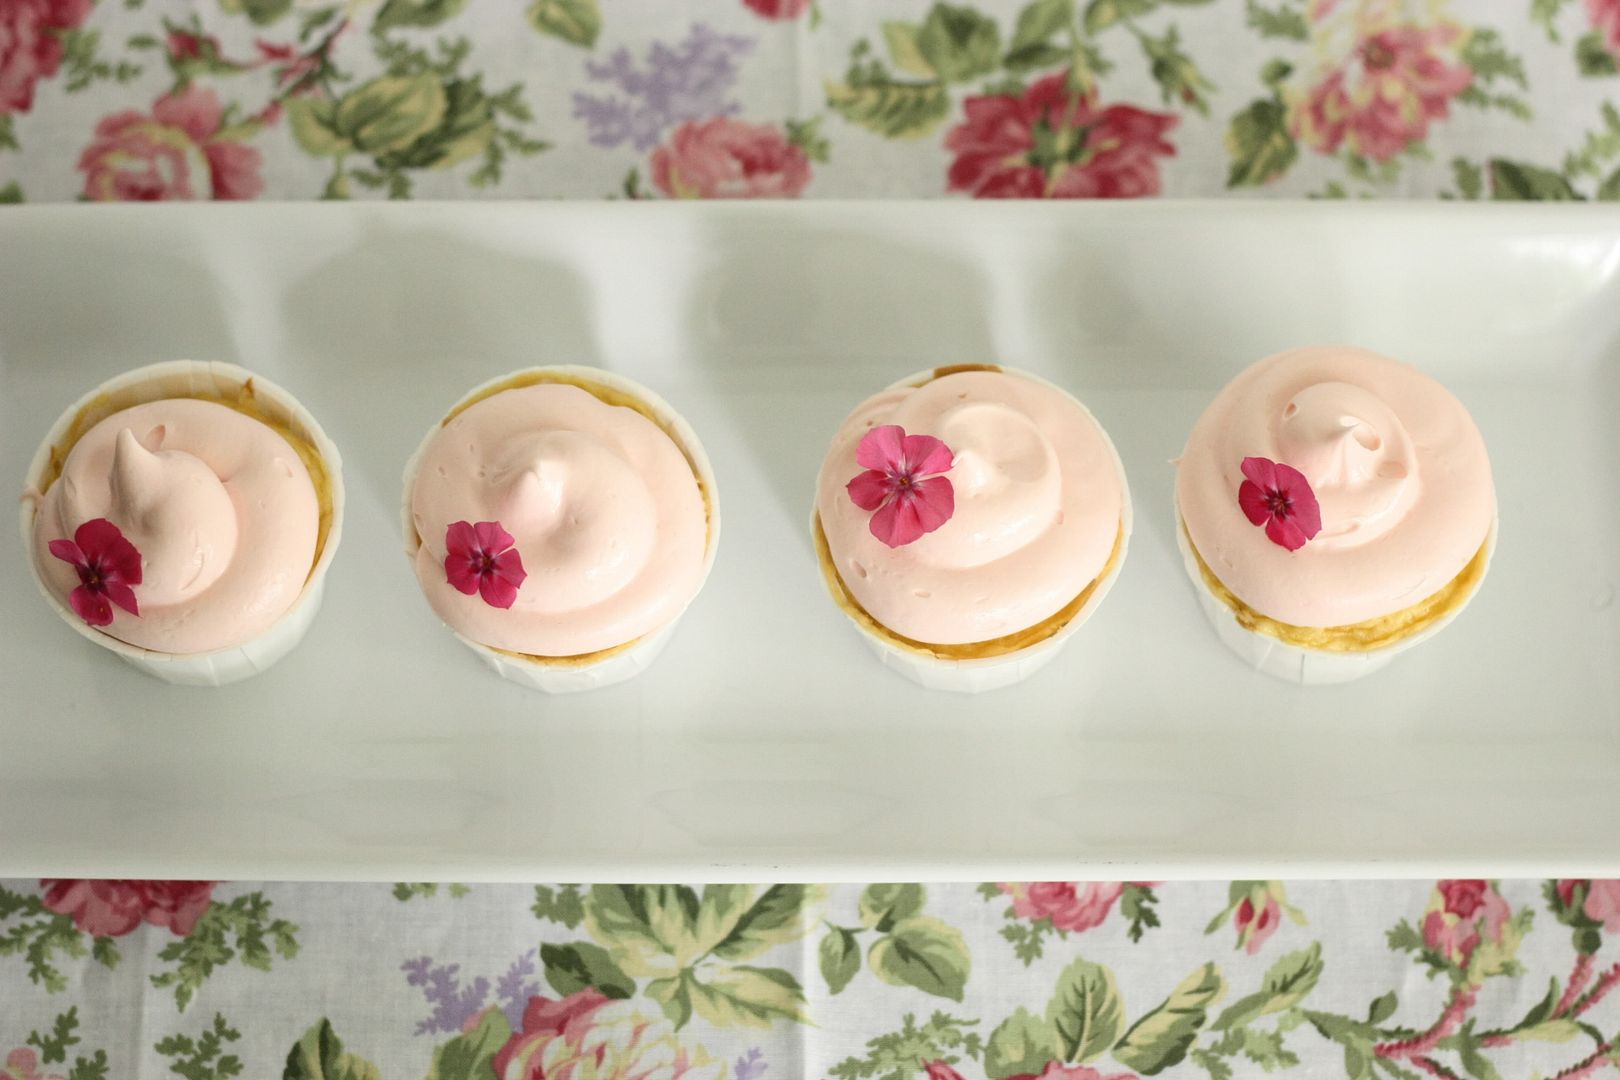
I tried a different decorating method and spread the frosting on top with some pink sprinkles.


I also baked blueberry scones on Saturday, post to come later this week. Did you have any fun baking adventures over the weekend?

Outrages Brownies Recipes

This is another one of Ina Garten great recipes. Just as the name said these brownies are outrages. It is rich, chewy and fudgy. I think the original recipe is way too much for us so I halved the recipes and bake it in a muffin pan. I original recipes call for a lots of butter but I reduced it to only one stick and it tasted just as good. For the full recipe please refer to here .


Ingredients:(Halved of the original)

2 sticks/226 grm/1 cup of unsalted butter (I used 1 stick/113 grm)
6 oz semisweet chocolate chips
3 oz unsweetened chocolate
3 large eggs
1 ½ tsp instant coffee
1 tbsp pure vanilla
1 cup + 2 tsp sugar (I used 1 cup)
½ cup flour
1 ½ tsp baking powder
½ tsp salt

For tossing together:

2 tbsp flour
1 ½ chopped walnuts (I used 1 cup)
6 oz dark chocolate chips

1. Greased a muffin pan. Pre-heat oven to 350 degree F.
2. Melt together butter, semisweet chocolate chips and the unsweetened chocolate in a medium bowl over simmering water (double boil). Allow it to cool slightly.
3. In another bowl stir together eggs, instant coffee, vanilla and sugar. Stir in warm chocolate mixture into the egg mixture and allow it to cool to room temperature.
4. Sift together ½ cup flour, baking powder and salt. Add into the cooled chocolate mixture.
5. Toss the dark chocolate chips and walnuts together with the 2 tbsp of flour and then add it into the chocolate batter. Mix well and fill the batter into the muffin tin.
6. Bake for 25 minutes or until a toothpick comes out clean when tested.

Note : This batter will make about 1o medium size brownies

Cupcake topiary - Dairy Foods

{Photo credit: Kristen of Miss Prissy Paige}

I've seen quite a few topiaries lately, are they becoming somewhat of a trend??? Check out this adorable cupcake topiary sent to me by Kristen of Miss Prissy Paige blog. Kristen made this topiary for Mother's Day. If you are inclined to make one yourself she has a full tutorial on her blog.

Have a fabulous weekend!

Pan Fried Bean curd Rolls Recipes

Who can resist these crispy rolls? It is a must order dish for me if I go for dim sum restaurant. I just like the crispy skin made out of bean curd skin and the fillings of ground meat, carrot bits and crunchy water chestnuts. Since I still have bean curd skin leftover from my Yong Tau Foo I decided to make some.

Ingredients:

16-17 pieces of 5 1/2” x 3 1/2” bean curd skin
3 tbsp of flour + 4 - 5 tbsp of water – mix into a paste for sealing the rolls

Filling:

½ pound ground chicken or pork
15 large shrimps – peel, deveined and roughly chopped
6 water chestnuts – cut into small cubes
1 small carrot – peels and grated
3 spring onions – cut small
1 small red chili – chopped (optional)
2 tbsp cornstarch
½ beaten egg
1 tbsp oyster sauce
2 tbsp of soy sauce
½ tsp sesame oil
½ tsp black pepper
Salt the taste

1. Mix all the filling ingredients until well combined. Set it aside in the fridge for an hour.
2. Take about 1 ½ tbsp of filling and spread it at one end of the beancurd skin. Brush a bit of the cornstarch mixture on the other 3 end of the bean curd skin. Roll up to seal. Do the same to the rest of the beancurd skin.
3. Heat a bit of oil in a frying pan, pan fried both side of the rolls over medium heat until golden brown. Drain the oil on paper towel.
4. Serve warm with some chili sauce.

Tomato, basil and goat cheese tartlets - Dairy Foods


I made these tomato, basil and goat cheese tartlets last weekend inspired by a recipe from the last Whole Foods cooking class I attended. Click here for the recipe. I made a bunch of modifications including swapping out the olivada (the olive, garlic, thyme and olive oil puree) for tomato and basil and used herbed, crumbly goat cheese instead of goat brie. I used a small wine glass (or maybe it was a champagne glass?) to cut out the circles.

These were awesome and really simple appetizers. Puff pastry is my new best friend.


Adorable pies in jars - Dairy Foods

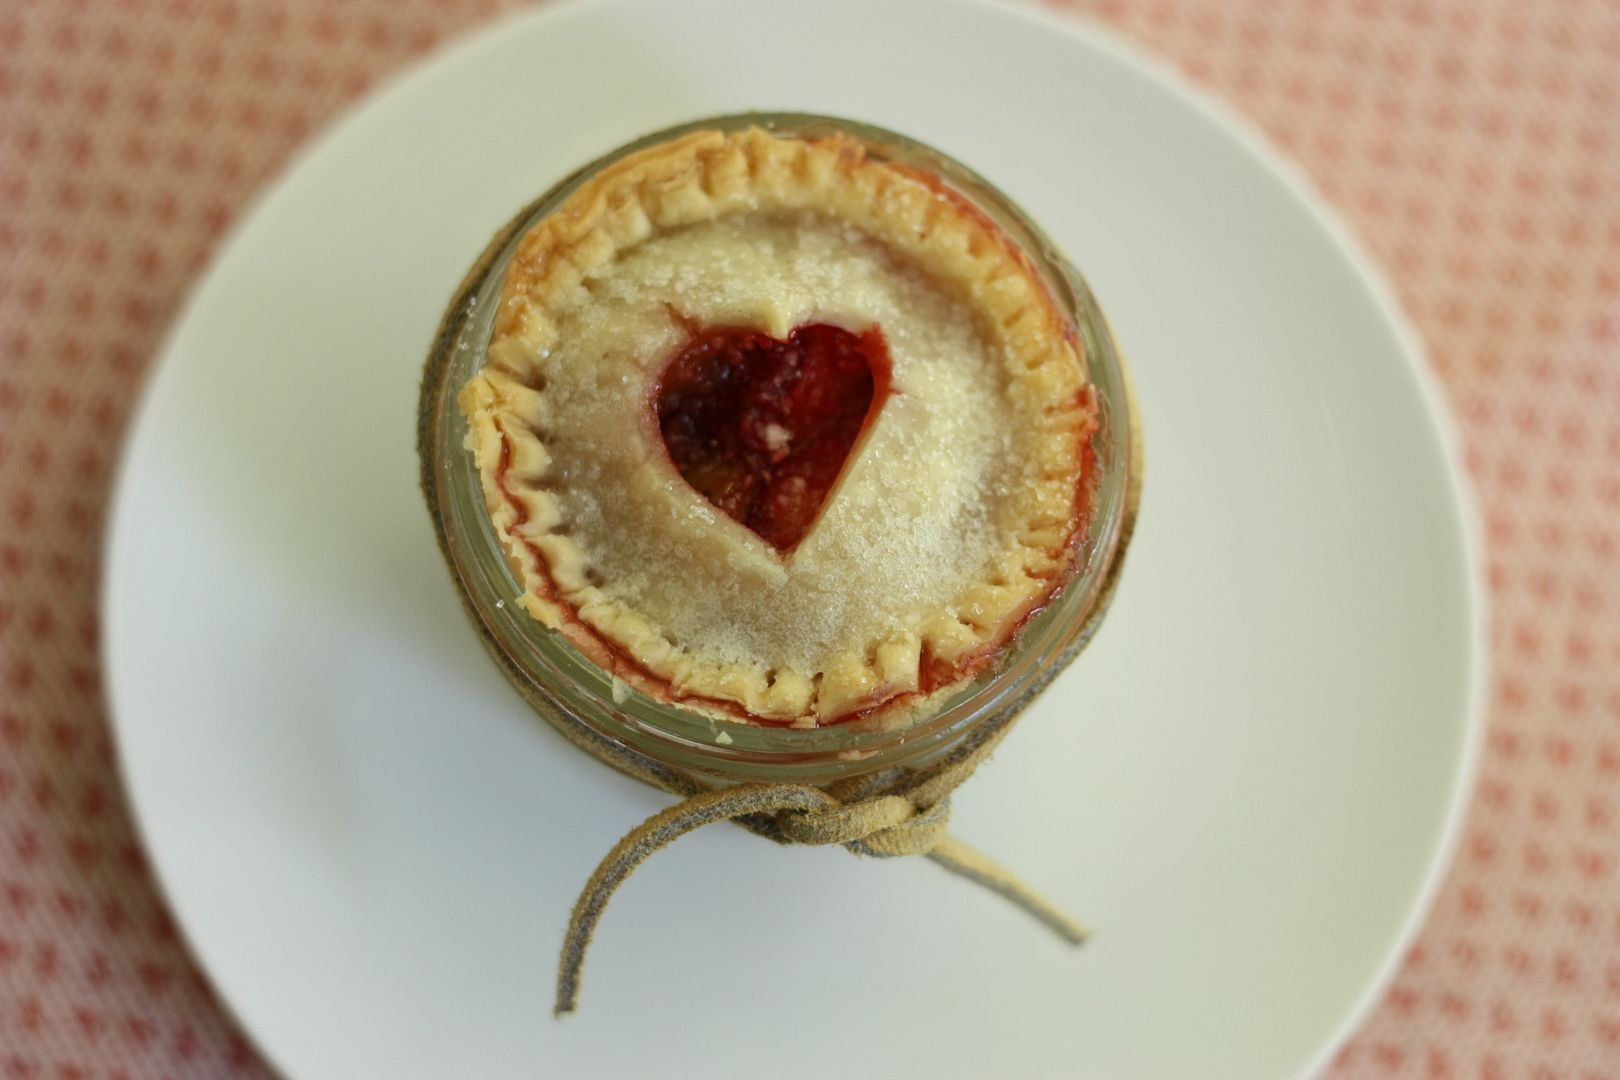
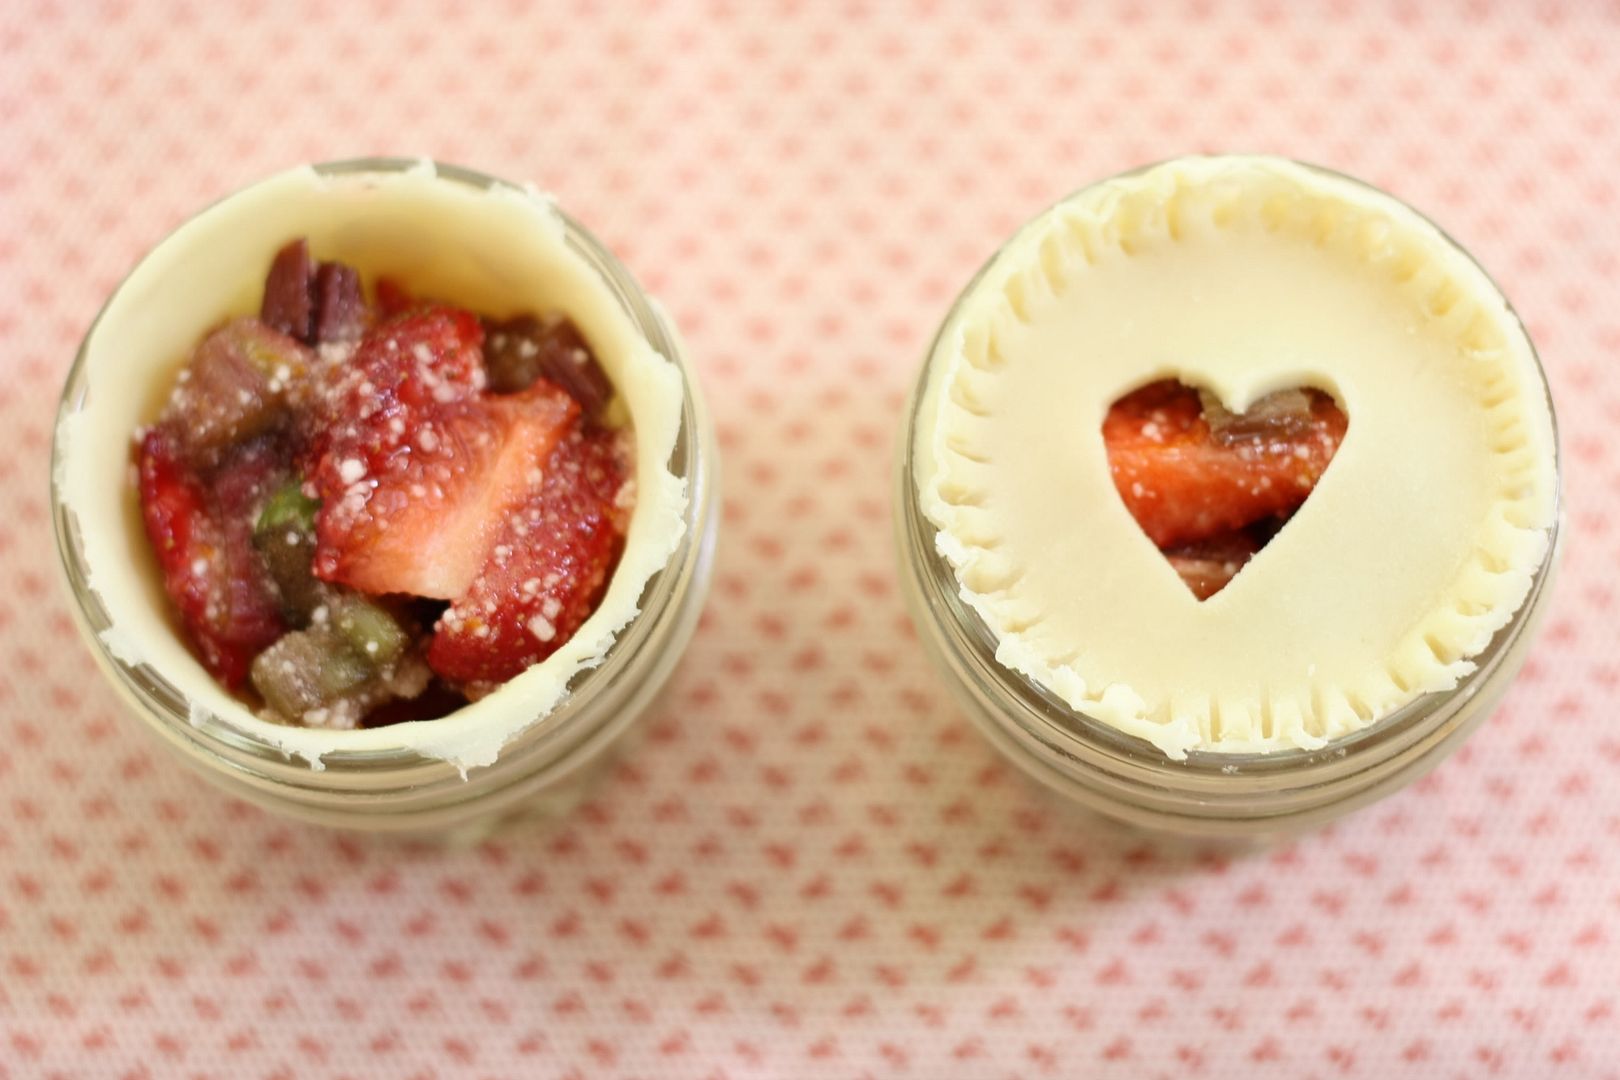
Are you ready for total pie cuteness overload? I made these pies in jars last Friday on my day off from work after finding some inspiration from the blogosphere. I was thrilled that not only were these super easy, but they are delicious and the freaking cutest thing I've ever seen.

I purchased the mini canning jars from Ace Hardware (12 jars for $9.50) and used a pre-made unbaked pie crust (near the pillsbury biscuits in your grocery store). For the filling I used a strawberry rhubarb filling from Simply Recipes. The filling is very easy and a great way to use rhubarb, which is very much in season right not.

Strawberry Rhubarb filling (adapted from Simply Recipes)

Ingredients

3 cups rhubarb stalks cut into 1/2 inch pieces (Trim outside stringy layer of large rhubarb stalks; make sure to trim away any and discard of the leaves which are poisonous; trim ends.)
1 cup strawberries, stemmed and sliced
1 cup sugar
3 Tablespoons of quick cooking tapioca (I used Minute brand tapioca)
1/4 teaspoon of salt
1 teaspoon of grated orange peel

Method
Mix the rhubarb and the strawberries with the sugar, tapioca, salt, and orange rind. Let sit for 10 minutes.

For directions on how to assemble and bake the pies in jars, check out Our Best Bites blog.


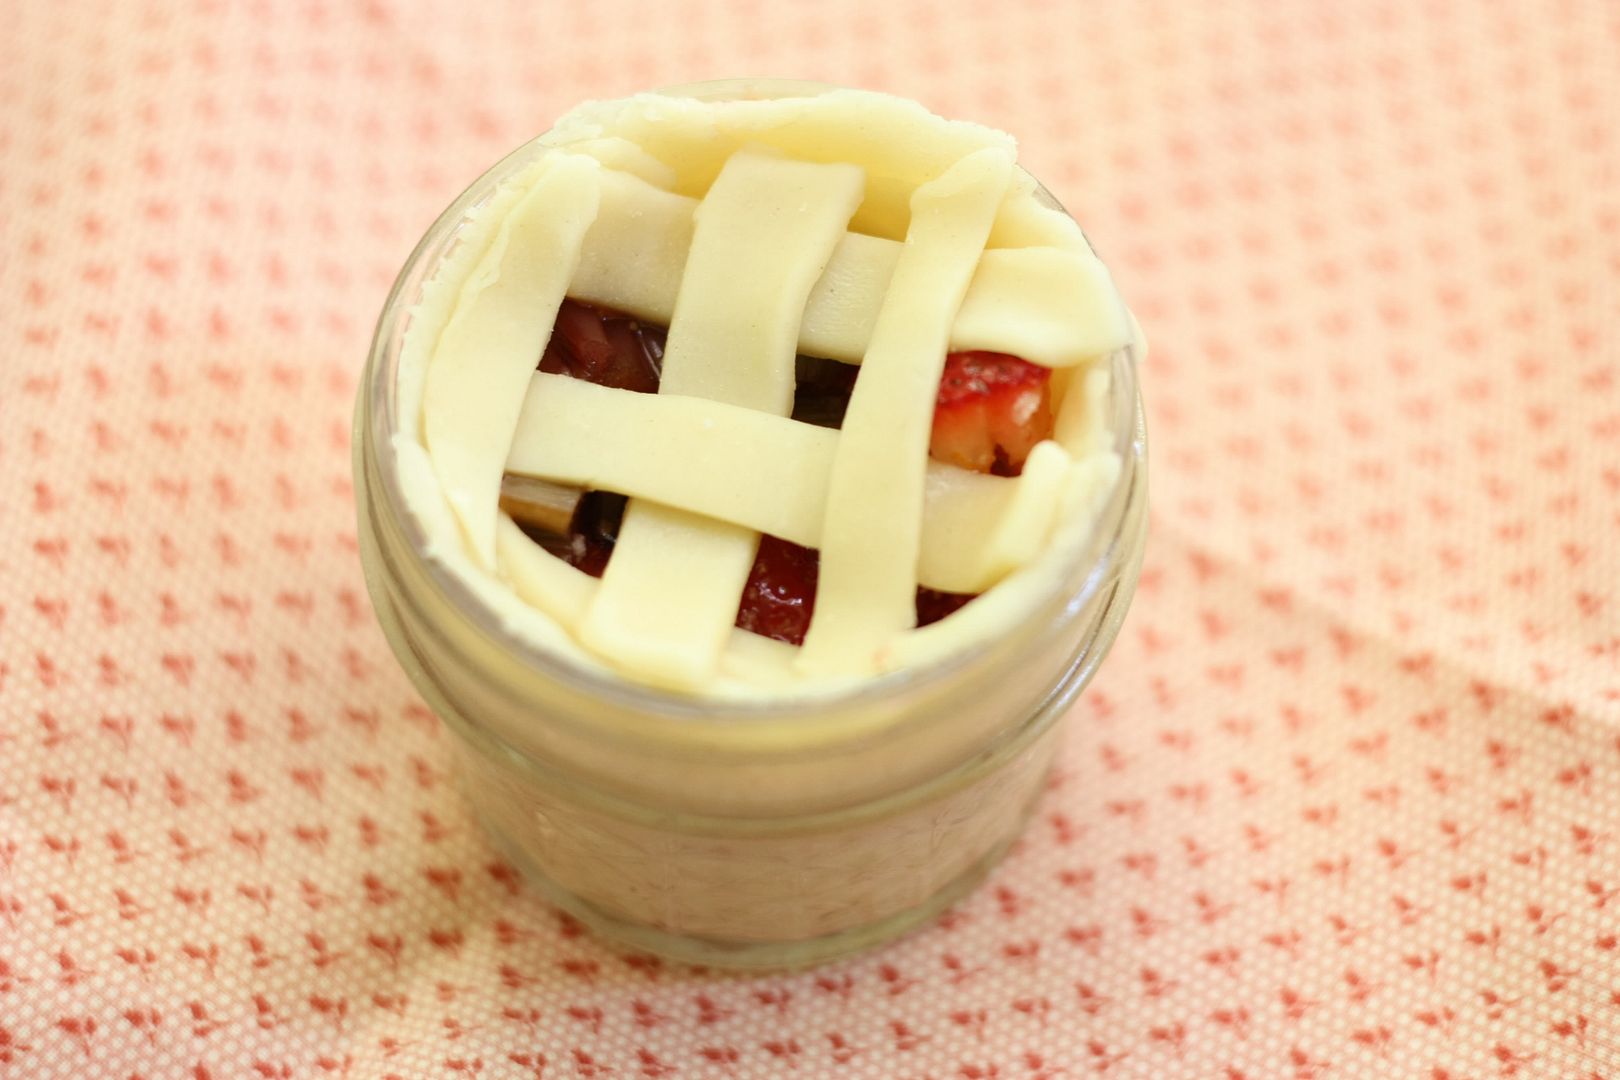
I even attempted a mini lattice pattern...didn't turn out that great but still pretty cute!


I made a few of these mini pies in jars and some of the tops sunk in or the filling oozed out. I think you have to be very careful about only spooning the solid filling into the jars and avoid too much liquid. Also, be sure to not put too much filling into the jar or it will overflow while baking.


I had some extra pie crust and strawberry rhubarb filling so I made some pie pops, instructions courtesy of the always amazing Bakerella. These were also super easy and perfect, little bites of pie. Can you stand the cuteness???

Make these pies in jars and pie pops! They were both incredibly easy but has a major wow factor. They would be perfect for any baby/bridal shower.

Coconut Filled Lemon Cake Recipes

Summer is just around the corner and we have bountiful of citrus fruits here. The lemons that I bought that day were huge and I used it to make this cake. I got this recipe from King Arthur Flour website. This cake is perfect in many ways. It has golden brown crust, fine crumbs and the coconut filling is a nice surprise. If you don’t fancy coconut you can just omit the filling and have a lemon cake instead.

Ingredients for the Filling:

2 large egg whites
¼ tsp cream of tartar
1/8 tsp salt
½ cup powder/confectioner’s sugar
½ tsp of coconut flavor or 2 tsp vanilla (I used vanilla)
2 tbsp flour
2 cups shredded sweetened coconut (I used only 1 ½ cups)

1. In a clean mixing bowl, whisk egg white, salt and cream of tart until soft and fluffy. Add in the powder sugar and continue to whisk on high speed until stiff. Stir in the vanilla.
2. Toss the coconut with the 2 tbsp of flour. Add into the egg white and mix well. Set it aside while you make the cake.

Ingredients for the Cake:

2 stick/1 cup/226 grm unsalted butter – room temperature
2 cups sugar (I used only 1 ½ cups)
1 tsp salt
4 large eggs
2 tsp baking powder
3 cups flour
1 cup milk
Zest of two lemons

Glaze:

1/3 cup freshly squeezed lemon juice
¾ cup sugar (I used only 1/3 cup)

1. Preheat the oven to 350°F. Lightly grease a 9" to 10", 9 to 10-cup capacity Bundt-style pan, or a 10" tube pan. Sift flour, baking powder and salt and set it aside.
2. Beat together the butter, sugar, and salt, first till combined, then till fluffy. Add the eggs one at a time, beating well after each addition, and scraping the sides and bottom of the bowl after adding each egg.
3. Add in the flour alternately with the milk, starting and ending with the flour. Mix until smooth. Stir in the grated lemon zest. Mix well. Spoon about 1/2 of the batter into the prepared pan, smoothing the top with a spatula.
4. Distribute the filling atop the batter, centering it within the ring of batter so it doesn't touch the sides of the pan. Pat it down gently. (I put the filling in a piping bag and pipe it to the center of the batter) Dollop the remaining batter on top, again smoothing it with a spatula.
5. Bake the cake for 50 to 55 minutes, or until a cake tester inserted into the center comes out clean. While the cake is baking, make the glaze by stirring together the lemon juice and sugar. Set it aside.
6. Remove the cake from the oven, and set it on a rack. After 5 minutes, run a knife around the edge of the pan to loosen, and turn the cake out onto a rack. Poke the hot cake all over with a cake tester or toothpick. Stir the glaze to combine, and immediately brush it on the hot cake, Let the glaze sink in, then brush on more glaze, continuing until all the glaze is used up. Allow the cake to cool before cutting into it.