Showing posts with label dessert. Show all posts

Assortment of Pineapple Tarts Recipes

Chinese New Year won’t be complete without these little morsels. Pineapple tarts are usually available during CNY. So, what makes a good pineapple tart? For me it have to be bite size so that you won’t feel too guilty eating too many of it. The pastry has to be buttery, sturdy enough to hold the jam but soft enough to melt in your mouth. The jam is flavored with cinnamon and I like the jam to have a hint of sourness in it. I like my tarts to have plenty of jam on it so I do not skims on the pineapple jam. When the flavor of the buttery tart and the jam comes together, it should strike a blissful balance. I don’t think anyone can stop at just eating one or two. Forget about your diet. Start your diet only after CNY ha ha...


Since most of you already have your favorite recipes for the tarts so I am not going to post it here but if you want it you can always check my previous posting here . I am just showing some pictures of the tarts I made using different design. There are so many designs and patterns out there now compare to years ago which only have one. Enjoy and let me know which one is your favorite design for the tarts.

I am submitting this cookie to Aspiring-Bakers # 3 My Favourite CNY Cookies hosted by j3ss kitch3n

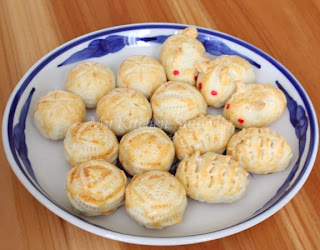
This is the most traditional looking ones

This design has been around for some time now. To make this the dough have to be pretty soft.

This mould do not have an indentation at the center so it is quite difficult to put the pineapple jam.

I like the design of this one. Great for Valentine's Day but not easy to put the jam either.

I like this new mould the best. Great indentation in the center to hold the jam.


I love the design of this one but the mould is not so easy to work with.

This is the design that you can make even without the pineapple tart mould. Just take a round cookie cutter, cut the pastry, put the pastry in a small muffin tray, filling it up with jam and voila!!! Pineapple Tarts

Here are some enclosed ones. These involves more work and longer time to make.


Last but not least all the moulds and tool that I used to made these. Making pineapple tarts is hard work. No wonder people bake this once a year ;)

Osmanthus Cookies Recipes


CNY is just around the corner and I see a lot of cookies popping up from fellow blogger’s blogs. It is making me very nervous as I’ve just started to bake mine. This is the very first cookie that I made for CNY using dried Osmanthus flowers. I only used the Osmanthus once to cook this chicken dish and I still have a big jar of it. I think the Osmanthus gives a really nice fragrant to the cookies and it is just the perfect fit for CNY celebration. If you’re looking for something different to bake for the CNY I hope you will try this out. I am submitting this cookie to Aspiring-Bakers # 3 My Favourite CNY Cookies hosted by j3ss kitch3n .

Ingredients:

180 gram unsalted butter – room temperature
140 gram icing sugar
1 egg yolk
260 gram flour
40 gram cornstarch
1 tsp baking powder
½ tsp salt
2 tbsp dried Osmanthus flowers
1 egg – for egg wash


1. Sieve flour, cornstarch, baking powder and salt together. Set it aside. Get ready a sheet pan and line it with parchment paper.
2. Beat sugar and icing sugar until light and fluffy. Add in the egg yolk and continue to beat until combined. Add in the osmanthus flowers. Mix well.
3. Lower down the speed of the mixer and slowly add in the flour mixture until the dough comes together.
4. Transfer the dough to a work surface that is lightly floured, roll out the dough to about ¼”, cut into desired shapes and transfer it to the baking sheet.
5. Brush the top of the cookies with egg wash and bake in a pre-heated 325 degree oven until the edges are lightly brown. Transfer to cooling rack and store in an airtight container when it is cool.


Note: If the dough is too soft, wrap it up and let it rest in the fridge for an hour before rolling it out.

Pani Popo/Coconut Buns Recipes

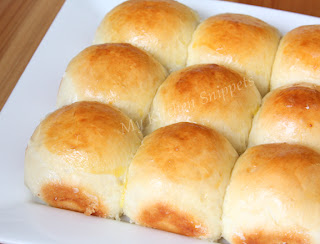
Pani Popo is the traditional name for a sweet and sticky bun that originated in the South Pacific Islands of Samoa. In English Pani means bun and Popo means coconut. These buns are baked in a pool of thick sweet coconut milk. When I baked these the whole house smell so good and they taste even better right out of the oven. Soft, sweet and the sticky coconut at the bottom tasted just like kaya. I am so in love with these buns. If you like this type of buns please tries this out. I am sure you are going to like it too.


Ingredients:
Adapted from Try Anything Once

2 cups bread flour
¾ cup warm milk
¾ tsp dried yeast
1 tsp sugar
¼ tsp salt
1 tbsp butter
½ cup thick coconut milk
3 tbsp sugar
1 egg – beaten for egg wash


1. Mix the lukewarm milk, yeast and 2 tsp sugar in the mixing bowl. Leave it for a few minutes until the yeast started to bubble. Add in the butter and salt.
2. Add in the 2 cups of flour. Mix and knead the dough until it form into a smooth balls. I used KithcenAid to knead and it took about 5 minute.
3. Let the dough rest in a butter bowl until doubled in volume. Prepare and grease an 8” x 8” square pan or a round baking pan.
4. Remove the dough from bowl and divide it into 9 round balls. Place them in the baking pan, cover and let it rest again until double in size.
5. In the meantime, mix the coconut milk with the 3 tbsp of sugar (if you use can coconut milk it might be too thick or harden, you can always warm it up in the microwave oven for a few seconds)

6. Brush the buns with some egg wash. Pour the sweeten coconut milk over the buns and bake in a pre-heated 375 degree F oven for 30 minutes or until golden brown. Serve warm.


Note: These buns will harden up a bit the next day, just warm it up in the microwave for a few second and it will soft again.

Kaya Balls/Coconut Jam Balls Recipes

I always wanted an electric Takoyaki pan but can’t bring myself to buy it because it cost way too much money for a small gadget. I was so happy when Diana gave me that for Christmas. I promise her that we will make Takoyaki together when she comes home the next time. In the meantime I can’t just let the pan sitting in the kitchen counter without making anything out of it so I decided to try my hand in making Kaya Balls.

These little bite sized delights are commonly sold in Malaysia shopping center food courts. . They are basically little dome-shaped buns filled with kaya (coconut egg jam), chocolate or peanut butter. I tried goggling for the recipe but can’t seem to find the one I want. So this recipe is something I come up with and it turn out pretty good.


Ingredients:

150 gram cake flour
30 gram cornstarch
1 tbsp custard powder
70 gram sugar
1 tsp baking powder
¼ tsp salt
2 eggs
180 ml milk
1 tsp vanilla
2 tbsp oil
5 tbsp kaya/coconut jam
Some oil for greasing

1. Combined flour, cornstarch, custard powder, salt and baking powder. Mix well and set it aside.
2. Whisk eggs and sugar until well corporate, add in the milk and stir well. Stir in the flour mixture until you get a smooth batter. Add in the vanilla and oil. Set the batter aside to rest for half an hour.
3. Pour the batter into measuring cup for easy pouring. Turn on the Takoyaki pan; brush it lightly with some oil. Pour some batter into each holes about ¾ full, add a little dollop of kaya in the middle of the batter.


4. Once bubbles appear on top of the balls and the bottoms are lightly brown, use a wooden skewer and flip the balls over to cook the other side.
5. Once it is brown, remove the balls and transfer it to serving plate. Repeat the same to the rest of the batter.


Note: This Takoyaki pan does not come with a heat control, so I burned the very first batch of the batter. I have to switch on and off a few times just to control the heat.

I am entering this post in the Muhibbah Malaysian Monday roundup, created and hosted by Sharon of Test with a Skewer and Suresh of 3 Hungry Tummies.

Orange Scented Monkey Bread Recipes

Hi everyone, I hope all of you had a wonderful New Year celebration. Year 2010 was a pretty interesting year for me. Many things happened, some good and some not so good. But it was over and done with and I am looking forward to new 2011. Like all the past years I am not going to make any resolutions or goals. I know myself; I will make resolutions on January 1st and abandons it by January 8th so why bother. Instead, I am going to make list of things that I would like to do. Anyway, thank you all for visiting, support and also taking the time to comment. I really appreciate all your encouraging words.

Let start of the New Year with something gooey and sweet. I know, what a name for something so deliciously good, right. I tried to find the origin of the name ‘monkey bread’ and I can't really find the definitive background of it. I baked this for our breakfast and share some with our neighbor. We love this bread especially the taste of orange, cinnamon and brown sugar. The flavors are perfectly blended into the sweet and sticky buns. Best of all we get to pull the pieces apart when we eat it.


Ingredients:
Dough recipe adapted from: Smitten Kitchen

3 tbsp butter - melted
1 cup milk, warm (around 110 degrees F)
1/3 cup water, warm (also around 110 degrees F)
1/4 cup granulated sugar
1 package or 2 1/4 teaspoons dry yeas
3 1/4 cups all-purpose flour, plus extra for work surface
1 teaspoons table salt
1/2 cup of raisins - optional

Cinnamon Sugar Coating

3/4 cup sugar
2 tsp ground cinnamon
1 tbsp orange zest

Brown Sugar Syrup

1/2 cup dark brown sugar
4 tbsp orange juice
4 tbsp butter


1. Greased a Bundt pan generously with butter. In a large measuring cup, mix together milk, water, melted butter, sugar and yeast. Mix flour and salt in standing mixer fitted with dough hook. Turn machine to low and slowly add milk mixture. After dough comes together, increase speed to medium and mix until dough is shiny and smooth, 6 to 7 minutes.
2. Turn dough onto lightly floured counter and knead briefly to form smooth, round ball. Oil large bowl, place dough in bowl, cover with plastic wrap and place in a warm area until dough doubles in size, 50 to 60 minutes.
3. While the dough is rising, get ready the coating mix. Mix brown sugar, orange zest and cinnamon together in a Ziploc bag. Set aside.
4. To form the bread: Gently remove the dough from the bowl, and pat into a rough 8-inch square. Using a bench scraper or knife, cut dough into 64 pieces. Drop half of the cut pieces of dough into the Ziploc bag. Toss it around until the dough is well coated with cinnamon mix.

5. Remove the dough and layer the dough into the Bundt pan. Scatter some of the raisins around it. Do the same to the rest of the dough. Cover the Bundt pan with a plastic wrap and let it rest at a warm place until double in size.
6. In the meantime get ready the brown sugar syrup. Combined all the ingredients in a small saucepan, slowly melt the butter and brown sugar and bring it up to a boil. Let it cool down slightly.
7. Heat up the oven to 350 degree F. Drizzle the brown sugar syrup into the Bundt pan and bake for 40-45 minutes until brown and bubbly around the edges. Cool in pan for 5 minutes, and then turn out onto a platter. Allows to cool about 10 minutes before devour into it.

Note: Because of our cold temperature I made the dough the night before and let it raise overnight. You can omit the raisins or replace with different type of nuts. If the bread get too dark before it is done, just cover it with some foil and continue to bake.

Cranberry Orange Walnut Cake Recipes

There is abundance of fresh cranberries in the market now and I just bought a big packet without knowing what to do with it. It has been sitting in the fridge for nearly two weeks until I finally used it to bake some cakes to be given away as Christmas gift with the cookies. The orange juice and the zest in the cake compliment the cranberries very nicely. The fresh cranberries are tart and refreshing, while the cake is sweet. This loaf will be great for breakfast, afternoon tea especially during the holiday season.


Ingredients:

1 stick/113 gram soft butter
1 cup sugar
2 eggs
1 tbsp of orange zest
½ cup orange juice
½ cup sour cream
2 cups flour
1 tsp baking powder
½ tsp baking soda
½ tsp salt
1 1/2 cups fresh cranberries
½ cup walnuts – toasted and chopped


Glaze:

½ cup confectioners’ sugar
2 tbsp lemon juice

1. Line and greased a large loaf pan or two medium size loaf pans. Pre-heat the oven to 350 degree F. Shift the flour, salt, baking powder, baking soda and set it aside. Combined the orange juice and sour cream. Mix well and set it aside.
2. Cream butter and sugar until light and fluffy for 5-6 minutes. Add in the eggs, one at a time and beating continuously until well incorporated. Slow down the speed of the mixer and slowly add in the flour in 3 batches alternating with the orange juice – sour cream mixture. The last edition should be the flour. Do not over mix.
3. Stop the machines, using a spatula fold in the fresh cranberries and walnuts. Mix well. Pour into the baking pan and bake for 55 – 65 minutes or until golden brown. Remove from oven and let it rest on the pan for 10 minutes before turning it out on the cooling pan.
4. Let it cool completely. Combined the glaze ingredients and spread it over the top of the cake. Cut and serve.


Note: This cake improves in texture and taste after a day or two.

Sugar Cookies/Christmas Wishes Recipes

I baked these sugar cookies at the very last minutes for my nephew Eu-Xin in Malaysia. My friend is going back end of this month and she is taking these back for me. Thank you so much Choy and I am sure my nephew will be very grateful. I am not good at frosting it and in fact this is the first time I am doing sugar cookies. I hope I will do a better job the next time when I have more time to decorate it.


Ingredients:

1 stick/113 gram butter
¾ cup sugar
2 cups flour
½ tsp baking powder
¼ tsp salt
1 egg
½ tsp vanilla
2 tbsp milk

1. Prepare and line baking sheet pan with parchment paper. Sift flour, baking powder and salt and set it aside.
2. Cream soft butter and sugar until light and fluffy. Add in the egg, milk and vanilla. Mix well. Slow down the mixer and slowly add in the flour in two batches. Mix until just combined.
3. Transfer the dough to a work surface. Shape into two discs, wrap the dough with plastic wrap and let it rest in the fridge for an hour.
4. Pre-heat oven to 350 degree F. On a lightly floured work surface, roll out the dough to 1/8” thickness. Cut into desired shape and transfer to baking sheets pan, leaving an inch in between.
5. Bake until lightly golden, about 12-15 minutes. Transfer to wire racks to cool.
6. Decorate with Royal Icing if desired.

I am submitting this to Aspiring Bakers #2: Christmas! (Dec 2010) hosted by Passionate About Baking


To my family, friends and blog readers
May the spirit of Christmas bring you peace,
The gladness of Christmas give you hope
And the warmth of Christmas grants you love and joy.

Have a Blessed Christmas and A Happy New Year Everyone!!

Apple Cranberry Tea Ring Recipes

Weather is so cold and snowing outside and the best way to warm up the house is doing some baking. But it is definitely not a good idea to make bread. Wrong move on my part and because of the cold making this loaf of bread took me over 6 hours from start to finished baking. It just refused to rise. I even stick it into the warm oven to help with the proofing. The end results, I would prefer it to rise a bit more and softer. Nevertheless, it tasted good. I think this tea ring will be great for Christmas breakfast or brunch.

Ingredients
Dough recipe adapted from Taste Of Home recipe book.

3/4 cup warm milk (70°F to 80°F)
1/4 cup butter, melted
1 egg, lightly beaten
3 tablespoons water (you might not need it)
3 tablespoons sugar
3/4 teaspoon salt
3-1/3 cups bread flour
2-1/4 teaspoons active dry yeast


FILLING:

1/4 cup packed brown sugar
3 tbsp of sugar
3 tablespoons butter
1 cup of chopped fresh apple
1/2 cup dried cranberry
1/2 cup raisins
1/4 cup chopped walnuts

Egg wash

1 egg -beaten

Glaze

1/2 cup confections’ sugar
2 tbsp lemon juice


1. Place all the dough ingredients except for the water into a mixer attached with the dough hook. Mix the dough until comes together. If it is too dry add in the extra water a tablespoon at a time.
2. Continue to knead until the dough is smooth. Place it in an oil bowl, cover it with a cling wrap and leave it in a warm place to rise double in size for about 1 to 2 hours (depend on the temperature of your environment)
3. For the filling, combined sugars, cut in the butter until crumbly. Stir in the dry cranberries, raisins and walnuts and set it aside.
4. When the dough is done, turn it out onto a lightly floured work surface. Roll into a 20” x 10” rectangle, sprinkle with the sugar mixture and top it with the chopped apple within 1” of the edges.
5. Roll it up tightly like a jelly-roll, starting with a long side; seal ends. Place in a greased 15-in. x 10-in. x 1-in. baking pan; bring both ends together, seal it to form a ring.
6. With scissors, cut from outside edge two-thirds of the way toward center of ring at 1-in. intervals. Separate strips slightly; twist to allow filling to show. Cover and let rise until doubled, about an hour. Brush it with egg wash.
7. Bake in a preheated at 350° for 35-40 minutes or until golden brown. Remove and let it cool complete on a cooling rack. Mix the glaze and drizzle it all over the ring.

Note: To prevent overbrowning you can cover it with foil during the last 10 minutes of baking.

I am submitting this bread to Yeastspotting

Coconut Cookies Recipes

It has been a long busy week for me. I have been baking non-stop for the past 5 days. There were dozens and dozens of cookies being baked and tons of butter, sugar, flour and eggs used. I am so glad that I am finally done with it and it is going to some happy recipients before Christmas. The cookies I baked are mostly repeats like Walnut Cookies/Hup Toh Sow, Macadamia Chocolate Chips, Festive Meringue Kisses and this Coconut Cookies. Do come back for the Macadamia Chocoloate Chips cookies recipe later.


Ingredients:

250 grm flour
40 grm cornstarch
½ tsp salt
70 grm of dried coconut
180 grm soft butter
130 grm sugar
½ tsp vanilla

1. In a mixing bowl, sift flour, cornstarch and salt together and set it aside. Mix in the dried coconut. Line two baking sheet with some parchment paper.
2. Cream butter and sugar until well combined and light. Add in the vanilla and mix well. Fold in the flour mixture and mix well.
3. Roll the cookie dough into a small balls, arrange on the baking sheet and bake in a preheated 325 degree oven for 20-25 min or until lightly brown. Cool down completely before storing it in airtight containers.

Note: If the dough is too soft to handle, let it rest in the fridge for half an hour before shaping it.

I am submitting this to Aspiring Bakers #2: Christmas! (Dec 2010) hosted by Passionate About Baking

Festive Meringue Kisses Recipes

Christmas is just around the corner and it is time to do some baking. Like usual I will have to bake 3-4 types of cookies to be given away to friends, neighbors, mailman and a few others. This is the first time I am baking meringue kisses because I am not a fan of it as I find it to be a bit too sweet for my taste. This cookie is not difficult to make but it took a long time to bake so you have to be very patience. Baking it low and slow is the key to a perfect crispy and light kisses. It took me over 3 hours to bake these whole lots cookies.


Ingredients:

5 large egg whites
1 cup sugar
¼ tsp cream of tartar
½ tsp vanilla
Some red and green coloring


1. Prepare 2 large baking sheet pans, line it with parchment paper. Pre-heat the oven to 200 degree F.
2. In an electric mixer beat egg white and cream of tartar for 30 second over high speed. Gradually add in the sugar and vanilla. Beat until meringue holds stiff, glossy peaks.
3. Using a small spatula paint a red and green stripes inside the pastry bag fitted with star shapes piping tip. Fill the bag with meringue. Pipe small star shapes onto the baking sheet.
4. Refill bag as necessary, adding food coloring each time. Bake cookies rotating halfway through until crisp but not brown about 1 hour to 1 hour 15 minutes.
5. Let it cool completely on wire rack before storing it in an air tight container.

Note: You can change it to other flavors like lemon, peppermint, coffee, chocolate, strawberry, etc.

I am submitting this to Aspiring Bakers #2: Christmas! (Dec 2010) hosted by Passionate About Baking .