Showing posts with label Cakes. Show all posts

Kaya Balls/Coconut Jam Balls Recipes

I always wanted an electric Takoyaki pan but can’t bring myself to buy it because it cost way too much money for a small gadget. I was so happy when Diana gave me that for Christmas. I promise her that we will make Takoyaki together when she comes home the next time. In the meantime I can’t just let the pan sitting in the kitchen counter without making anything out of it so I decided to try my hand in making Kaya Balls.

These little bite sized delights are commonly sold in Malaysia shopping center food courts. . They are basically little dome-shaped buns filled with kaya (coconut egg jam), chocolate or peanut butter. I tried goggling for the recipe but can’t seem to find the one I want. So this recipe is something I come up with and it turn out pretty good.


Ingredients:

150 gram cake flour
30 gram cornstarch
1 tbsp custard powder
70 gram sugar
1 tsp baking powder
¼ tsp salt
2 eggs
180 ml milk
1 tsp vanilla
2 tbsp oil
5 tbsp kaya/coconut jam
Some oil for greasing

1. Combined flour, cornstarch, custard powder, salt and baking powder. Mix well and set it aside.
2. Whisk eggs and sugar until well corporate, add in the milk and stir well. Stir in the flour mixture until you get a smooth batter. Add in the vanilla and oil. Set the batter aside to rest for half an hour.
3. Pour the batter into measuring cup for easy pouring. Turn on the Takoyaki pan; brush it lightly with some oil. Pour some batter into each holes about ¾ full, add a little dollop of kaya in the middle of the batter.


4. Once bubbles appear on top of the balls and the bottoms are lightly brown, use a wooden skewer and flip the balls over to cook the other side.
5. Once it is brown, remove the balls and transfer it to serving plate. Repeat the same to the rest of the batter.


Note: This Takoyaki pan does not come with a heat control, so I burned the very first batch of the batter. I have to switch on and off a few times just to control the heat.

I am entering this post in the Muhibbah Malaysian Monday roundup, created and hosted by Sharon of Test with a Skewer and Suresh of 3 Hungry Tummies.

Cranberry Orange Walnut Cake Recipes

There is abundance of fresh cranberries in the market now and I just bought a big packet without knowing what to do with it. It has been sitting in the fridge for nearly two weeks until I finally used it to bake some cakes to be given away as Christmas gift with the cookies. The orange juice and the zest in the cake compliment the cranberries very nicely. The fresh cranberries are tart and refreshing, while the cake is sweet. This loaf will be great for breakfast, afternoon tea especially during the holiday season.


Ingredients:

1 stick/113 gram soft butter
1 cup sugar
2 eggs
1 tbsp of orange zest
½ cup orange juice
½ cup sour cream
2 cups flour
1 tsp baking powder
½ tsp baking soda
½ tsp salt
1 1/2 cups fresh cranberries
½ cup walnuts – toasted and chopped


Glaze:

½ cup confectioners’ sugar
2 tbsp lemon juice

1. Line and greased a large loaf pan or two medium size loaf pans. Pre-heat the oven to 350 degree F. Shift the flour, salt, baking powder, baking soda and set it aside. Combined the orange juice and sour cream. Mix well and set it aside.
2. Cream butter and sugar until light and fluffy for 5-6 minutes. Add in the eggs, one at a time and beating continuously until well incorporated. Slow down the speed of the mixer and slowly add in the flour in 3 batches alternating with the orange juice – sour cream mixture. The last edition should be the flour. Do not over mix.
3. Stop the machines, using a spatula fold in the fresh cranberries and walnuts. Mix well. Pour into the baking pan and bake for 55 – 65 minutes or until golden brown. Remove from oven and let it rest on the pan for 10 minutes before turning it out on the cooling pan.
4. Let it cool completely. Combined the glaze ingredients and spread it over the top of the cake. Cut and serve.


Note: This cake improves in texture and taste after a day or two.

Orange Scented Pound Cake Recipes

This is the perfect cake for breakfast, tea or even after dinner dessert. It is wonderfully moist, not too sweet with a nice aroma of orange. If you let the cake sit for a day or two it taste even better.

Ingredients:

2 stick/226 gram softened unsalted butter
4 tbsp. milk
3 eggs
1 3/4 cups flour
¼ tsp salt
3/4 cup sugar
3/4 tsp. baking powder
2 tbsp. grated orange zest


For the glaze:

1/3 cup sugar
1/3 cup freshly squeezed orange juice

1. For the cake: Preheat oven to 350°. Grease a 9 x 5” loaf pan or two small loaves pan with some butter.
2. Sift flour, baking powder and salt and set it aside. Beat soft butter and sugar together until light and creamy. Add in eggs one at a time until well incorporated into the butter. Add in the orange zest and vanilla.
3. Slowly fold in the flour and milk into the mixture. Mix well. Pour into the loaf pan and bake until skewer inserted in the center of the cake comes out clean. Allow the cake to cool on pan for 10 minute before turning it into the cooling rack.
4. For the glaze. Combine sugar and orange juice in a small saucepan and bring to a boil over high heat, stirring until sugar has dissolved. Reduce glaze by half. Brush some of the warm glaze over top of cake.

Prickly Pear Chiffon Cake Recipes

Now what is this exotic Prickly Pear?? They are known to few, the fruit of the nopales cactus (cacti with beaver tail-like paddles), are actually edible. Called prickly pears, these vibrant magenta color fruits are delicious,they taste like a cross between watermelon and pear. The best way to eat this is just cut it into halve and use a spoon to scoop out the flesh. The juice is often used to make jam or candy, but works wonders in cocktails and used in vinaigrettes for salads. I've seen people used the juice to flavor cream cheese frosting for cakes and have seen others boil it down with a bit of orange and lemon juice to make a sauce for fruit salads and cheesecakes.

We used to have one huge cactus plant at my mom house and there were plenty of these fruits on it but during that time we have no clue that they are edible. So the birds had a field time eating the sweet fruits.


Many Mexican markets, farmers markets, and some natural food supermarkets carry prickly pears, but you can find these mostly in California, the Southwest and Mexico. You can imagine my excitement when I saw these prickly pear fruits at our produce place as it is not easy to find them here in PA and without any hesitations I grab a few of it. It cost me quite a bit of money too.

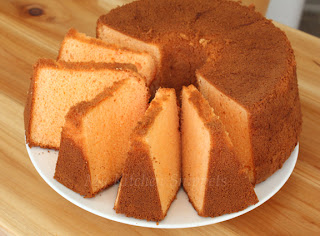
Here is what I made out of the beautiful fruits. The juice of this pear gives a really beautiful pink color to the batter but after baking it kind turn into bright orangey color.


Ingredients:
(A)
1 ¾ cups Self Rising Flour
1/8 tsp of salt

(B)
6 egg yolks
1/3 cup of sugar
3/4 cup Prickly Pear juice (you need 4 prickly pear to get the juice)
1/4 cup of vegetable oil

(C)
3/4 cup of sugar
6 egg white
1 tsp of cream of tartar

1. Cut the prickly pear into halve. By using a spoon scoops out all the flesh. Put it in a food processor and give it a few pulses. Strain out the juice to get rid of the black seeds. Set it aside.


2. Pre-heat oven to 325 degree F. Sieve all the (A) ingredient in a mixing bowl until well combined. Mix ingredient (B) until well blended and then add in ingredient (A) and mix until smooth. Set it aside.
3. Whisk ingredient (C) in mixer over high speed until stiff peak. It should not fall out when you turn the mixing bowl over. Fold 1/3 of the egg whites into the egg yolks mixture and continue to do so until egg whites is finish. Remember to fold in gently until well mixed.

4. Pour batter into ungreased 10" tube pan and bake for an hour or used a bamboo skewer to test the cake. Just insert the skewer into the center of the cake and it should come out clean.
5. Invert cake and let it cool complete in the pan. When is cool, loosen the edge of the pan and remove cake.


Note : Be warned though, while the ones in markets have been cleaned of the tiny hair-like thorns, the ones fresh off the cactus plant are covered with them, so be sure to handle them with heavy leather work gloves and scrub them hard to ensure all the painful little barbs are off. Also the juice might stain your clothing too. Either way, please handles them carefully.

I want to wish eveyone a very Happy Thanksgiving and hope you all have a wonderful time with your family and friend.

I am submitting this second chiffon post to Aspiring Bakers #1: Chiffon Cake (Nov 2010) hosted by Small Small Baker

Brown Sugar Cake Recipes

This cake is made with dark brown sugar. So far I think this is the first butter cake I made using dark brown sugar and I was pretty satisfied with the outcome. The brown sugar gives the cake a rich, buttery, caramel like flavor, almost like butterscotch. The cake taste even better the next day.


Ingredients:

2 stick/226 gram/1 cup butter
1 ¾ cups dark brown sugar
2 ½ cups flour
2 tsp baking powder
½ tsp salt
4 eggs
½ cup milk
1 tsp vanilla
½ cup chopped walnuts
1 cup dried cranberry


1. Pre-heat oven to 350 degree F. Grease and line an 8” round baking pan or loaf pan.
2. Sift all the dry ingredients and set it aside. In another mixing bowl, beat butter and brown sugar until light and creamy. Add in eggs, one at a time and beat well. Add in the vanilla.
3. Add in flour mixture in 3 batches and alternate it with milk. Mix well. Lastly fold in the walnuts and dried cranberry. Mix well. Pour into baking pan and bake for 45 minutes or until skewer inserted into the center of cake comes out clean.
4. Remove the cake from oven and let the cake cool completely on wire rack before cutting into it.

Dulce De Leche Chiffon Cake Recipes

When I went to the Latin store I will usually get a few jars of DDL. I used a jar for Carlos birthday cake and there were some leftover from it and decided to used it for Chiffon Cake. This was the first time I bake chiffon cake with it and I love the outcome of it. The cake has a nice fragrant of DDL and not too sweet. Even Carlos who never likes chiffon cake eats it. Do you think I convert him into liking chiffon cake? I don’t think so. If you ask me it is not the chiffon cake he likes but it is more of the DDL I drizzle on top ha ha… For this cake I used the Rainbow Chiffon Cake recipe but with very slight changes.

Ingredients A:

8 egg yolks
120 gram Dulce De Leche
20 gram corn flour
180 gram cake flour
1 tsp baking powder
½ tsp salt
100 ml vegetable oil
100 ml milk


Ingredients B:

8 egg white
50 sugar
1 tsp cream of tartar

1. Pre-heat the oven to 350 degree F. Get ready a tube pan. Do not grease it.
2. Sieve cake flour, corn flour, salt and baking powder. Set it aside. Combined the milk and oil together.
3. In a mixing bowl mix the egg yolk and Dulce De Leche until well combined. Add in the milk and oil mixture. Mix well. Lastly add in the flour mixture. Mix until the mixture is smooth.
4. In a mixer whisk all the ingredients B on high speed until soft peak.
5. Fold in the egg white into the egg yolk mixture in 3 batches. Fold until well combined.
6. Pour the cake into an ungreased tube pan and bake for 45-50 minutes or until skewer comes out clean when tested.

I am submitting this chiffon cake to Small Small Baker very first Aspiring Bakers#1 Chiffon Cake (Nov 2010) event.

Classic Yellow Cake with Dulce De Leche Frosting Recipes

I made this cake for Carlos birthday a few weeks ago. I asked him what cake he likes for his birthday and all he wants is a simple yellow cake with Dulce De Leche Frosting. Carlos (from Argentina) grew up eating DDL with all his dessert so it is his all time favorite. But for me when I heard DDL I already can imagine how sweet the cake will taste which I am not a big fan of, but since it is his birthday I can’t say no to his request. Then I remember seeing Wendy made frosting out of fresh cream and DDL and decided to use that.


As for the yellow cake it is just a simple yellow cake recipe which I used often but the highlight of this cake is the frosting. Let me tell you the frosting is to die for. The cake was not too sweet and has a great flavor of DDL. I will definitely use this frosting again for his birthday cake next year. For the frosting recipe you can refer to Wendy’s posting here.


Here are a few pictures I took of the cake. It is not the best looking cake as I hardly decorate a cake. If you are a regular reader of this blog you will notice that most of the cakes here are bare. Nevertheless Carlos was happy with it.

Baklava Recipes

Baklava is a delicious phyllo pastry popular in Middle Eastern countries. Its supposed origins are Turkish, dating to the Byzantine Empire (or even further), though many cultures claim it for their own. Many Greek and Lebanese restaurants do serve this. Baklava is usually layer with crispy phyllo dough alternate with sugary spiced nut mixture, and the whole thing is then soaked in fragrant sweet syrup made with honey, lemon and cinnamon.


The baklava I made is a bit different from the traditional kind. Instead of the layering kind I made it into rolls and didn’t bath it with sugar syrup or honey. I cut down the amount of sugar in the filling and replace it with some dried apricots. Making this is a bit time consuming and handling the tissue paper-thin phyllo dough can be tricky at times as they break easily. But the end results were all worthwhile. You will be rewarded with exotic, flaky, crunchy, sweet and decadent dessert.If you can get phyllo dough do try this out as I am sure you are going to love it as much as we do.


Ingredients:

½ cup toasted almonds
1 cup toasted walnuts
½ cup chopped dried apricots
3 tbsp sugar
1 ½ tsp ground cinnamon
3 tbsp honey
Zest of one orange
Juice of half orange or more

18 sheets of phyllo dough
1 ½ stick/3/4 cup tbsp of melted butter

1. Place all the ingredients except the phyllo dough and melted butter in the food processor. Run the machine until the mixture is finely chopped, sticky and comes together in a ball. If it is too dry add a bit more orange juice. Set it aside while you prepare the dough.
2. On a dry work surface place 1 sheet of phyllo. Using a pastry brush, lightly cover the entire sheet of phyllo with melted butter. Cover the first sheet with a second sheet of phyllo and brush with melted butter. Continue until there is a stack of 6 sheets of phyllo.

3. Cut the stacked phyllo rectangle into 6 equal pieces and then cut each strip into two. You will get 12 equal pieces all together.  Put about 1 tbsp of filling at one end of the pastry strip and then roll it up. Continue doing the same to the rest of the pastry.

4. Brush each roll with some melted butter and bake in a pre-heated 375 degree F oven until lightly brown.
5. Remove the baklava and let it cool on a wire rack before serving.

Cinnamon Raisin Swirl Bread Recipes

I used to be intimidated by bread making as usually I can’t seems to get it right but now I just love making bread. I guess practice makes perfect. I had a great time making this bread especially the anticipation on how the swirl will look like. I’m thrilled with the way it turned out. The swirl were beautiful, the crust had a lovely, deep golden color as a result of the egg wash, and the inside was rich and soft. We enjoyed this bread for our breakfast.

For the dough:

1 package/7 grm active dry yeast
1 1/2 cups lukewarm milk (~100°F)
3 tbsp sugar
3 3/4 to 4 cups unbleached all-purpose flour
1 teaspoons salt
4 tablespoons softened unsalted butter
additional softened butter for greasing bowl and pan


For the Swirl

1 cup raisins
1 Tbsp cinnamon + 3 tbsp sugar

For Eggwash

1 egg - beaten

1. Dissolve the yeast with 1/4 cup of lukewarm milk and 1 Tbsp of sugar and let it stand for 10 minutes. Combined the rest of milk.
2. In a mixing bowl, combined 3 3/4 cups flour, salt and the rest of the sugar. With the paddle attachment, turn on the mixer to medium speed.
3. Pour in yeast mixture slowly to the flour, add in the butter. Continue to knead until smooth and elastic. At this stage if the dough is too sticky you might need to add in the rest of the flour. Continue to knead until smooth. This will takes about 7 minutes. Place the dough in a greased bowl, cover with plastic wrap or a kitchen towel. Let it rise in a warm place until doubled in size.
4. Mix together the sugar and cinnamon powder in a small bowl.
5. Punch down the dough; roll them out on a floured work surface to about 16” x 8”. Brush the surface lightly with some water and sprinkle them with the cinnamon sugar mixture. Top it with the raisins.
6. Roll the dough up from the short end and pinch the seams shut. You should have a 9” inch long roll.
7. Place in a well greased loaf pan, cover with plastic wrap and let it rise for an hour. Brush the top with some beaten egg.
8. Baked in a pre-heated 375 degree oven for 40 minutes or until rapping the bottom of the loaf produces a hollow sound. Remove from oven and let it cool on a wire rack before slicing into it.

I am submitting this bread to Yeastspotting

Fruit Pastry Cake II Recipes

This cake is very popular among bloggers awhile ago. The last time I baked this cake was in 2007 for a gathering. This cake is very versatile and you can actually put any type of fruits you like on top of it. In my opinion this cake taste better the next day as the juices of the fruits really seeps into the cake. It is light and not greasy. I am not going to post the recipe here as I am sure most of you already have it but if you want you can refer to my old posting here .


I baked this cake for my friend Zue when I visited her at Harrisburg for Hari Raya. Here are some pictures I took of the cake.

Cranberry Orange Glazed Scones Recipes

I like baking scones for our weekend breakfast or for afternoon tea. This is one basic recipe that I used over and over again. I tried many different additions by adding toasted nuts, different dried fruits and fresh berries to it and each time it come out perfect. These scones are soft, moist, and scrumptious especially like the chewiness of the dried cranberries and sweet orange glaze. There's nothing better than serving these remarkable scones warm with a cup of tea or coffee.


Ingredients:

2 cups of flour
1 stick/1/2 cup/113 grms cold butter
3 tbsp sugar
11/2 tbsp grated orange zest
2 tsp baking powder
1/2 teaspoon salt
1 cup dried cranberries
2 eggs
¼ cup + 3 tbsp milk


For egg wash

1 egg + 2 tbsp milk – beat together
some sugar for sprinkle

For Glaze

1/4 cup confectioners' sugar
2 tablespoon orange juice

1. Preheat the oven to 400 degrees F. Line the baking pan with parchment paper.
2. In the bowl of an electric mixer fitted with a paddle attachment, mix flour, sugar, the baking powder, salt and orange zest together. Add the cold butter and mix at the lowest speed until the butter is the size of peas.
3. Combine the eggs and milk and, with the mixer on low speed, slowly pour into the flour and butter mixture. Mix until just blended. If the dough is too dry add a bit more milk.  Add in the dried cranberries the dough, and mix on low speed until blended.
4. Pour the dough out to a well-flour work surface. Knead lightly to form a ball. Flour your hand and rolling pin and roll out the dough to ¾” thick.
5. Using a knife or a cookie cutter cut into desired shapes. Place the scones on the baking pan. Collect the scraps of dough and roll it out and cut into shapes again.
6. Brush the top of the scones with egg wash, sprinkle it with a bit of sugar and bake for 25 to 30 minutes or until lightly brown and the insides are fully baked. The scones will be firm to touch.
7. Allow the scones to cool for 15 minutes and then whisk together the confectioners’ sugar and orange juice and drizzle over the scones. Serve with some jam and butter.