Porcupine Lotus Paste Steamed Buns Recipes

On my last trip home I bought a lot of cooking and baking books. One of them is Vegetarian Dim Sum by Chin Mun Chong. I am not a vegetarian but the pictures of the dim sum inside the book look so good that I just have to get it. I decided to make the Porcupine Pao from the book. I just love the look of these buns, aren’t they cute? Carlos helps me to cut some of the prickles of the porcupine. For a first timer I think he did a pretty good job. The skin of the buns texture is very much like the flower mantau. It is kind of chewy and not too fluffy. As for the filling I used lotus paste but you can replace it with kaya or even red bean paste.

Since this is the first time I am trying out the recipe from the book so I am not sure how good they are so I decided to half the original recipe.

Ingredients:

300 grm bao flour or Hong Kong flour
5 grm baking powder
6 grm yeast
55 grm sugar
1 tbsp of shortening
115 ml water (I need about 145 ml)

Fillings:

Lotus Paste or red bean paste

* Few drop of red food coloring

1. In a mixing bowl, mix all the dried ingredients until well combined. Slowly add in the water (you might need more or less and it all depend on the flour) until it form into a dough. Then add in the shortening. Mix until smooth.
2. In the meantime, take a tbsp of the lotus or bean paste and roll it into a ball. Make about 12-13 pieces.
3. Cover the dough and let it rest at a warm place for 2 hours. After 2 hours. Divide the dough into 12-13 pieces. Roll the dough into round balls and wrap in the fillings.


Carlos shaping the prickles
4. Shape the dough into oval shape. Using a sharp scissors snip the top part of the dough to form prickles to shape as a porcupine. Put two red dots at the head of the porcupine to form the eyes. Put the bun on top of the greaseproof paper and set aside to proof for 20 minutes.
5. Prepare a steamer with rapid boiling water, add a few drop of white vinegar to the water and steam the buns for 8 minutes. Serve warm.


Note: If you can't find bao flour or Hong Kong flour you can always replace it with regular all purpose flour.

Mac n' cheese soup and buffalo chicken "fries" - Dairy Foods

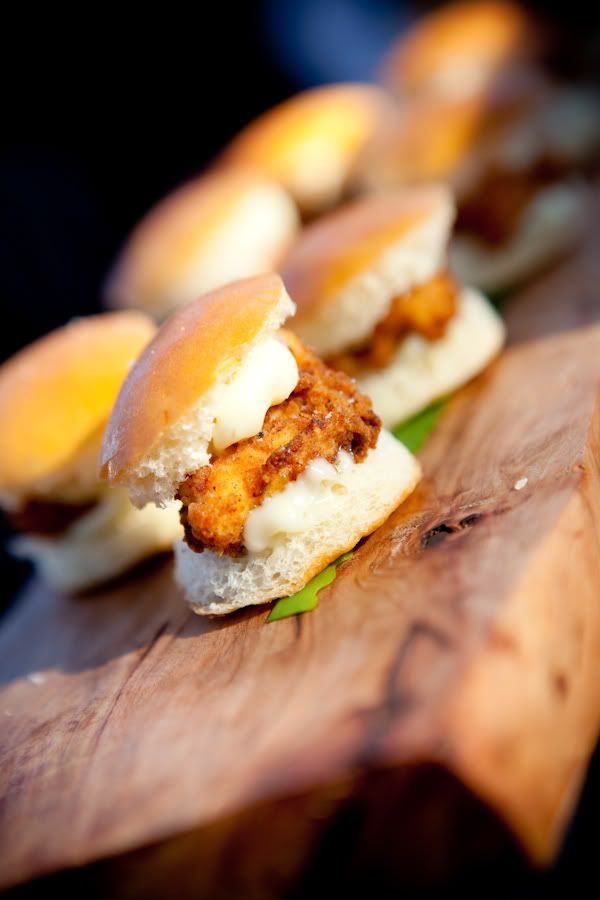
I can barely type this post because I'm so full. But I promised my honey I would blog about the yummy meal he cooked for me; mac n' cheese soup and buffalo chicken "fries". It was delicious.

I randomly received a new cooking magazine in the mail called Cuisine at Home. It actually has a bunch of great recipes, but these were the first we tried. Make this dinner, you won't be disappointed. The photo doesn't nearly do it justice, as soon as the sun goes down and I don't have natural light my photos go south. Still learning!

Though the name of the mac n' cheese has the word "soup" in it, I think it is really more of a stove-top mac n' cheese. There is nothing very soupy about the dish, it is very creamy, cheesey...not liquidy like you would imagine with a soup.

Mac n' Cheese Soup (adapted from Cuisine at Home magazine)

Ingredients

1 1/2 cups dry elbo macaroni
1/2 cup minced onion
1/4 cup minced celery
2 Tbs. unsalted butter
1/3 cup all-purpose four
1/2 cup dry white wine
2 cups low-sodiun chicken broth
1 tsp. dry mustard
1/8 tsp. ground nutmeg
1/8 tsp. cayenne pepper
2 cups whole milk
4 cups shredded sharp cheddar
1 Tbsp. fresh lemon juice
Salt to taste
1/4 cup crumbled blue cheese
2 Tbsp. minced fresh chives

Preparation

Cook macaroni in a pot of salted wsater according to ackage directions; drain and set aside.

Sweat onion and celery in butter in a large saucepan over medium heat until soft, about 5 minutes.

Stir in flour to coat and cook 1 minute. Deglaze with wine and simmer until nearly evaporated. Stir in broth, mustard, nutmeg, and cayenne. Simmer until slightly thickened, about 5 minutes, then whisk in milk and warm through. Do not let boil or base may become grainy.

Add cheddar, 1 cup at a time, allowing it to melt completely before adding the next cup. Stir in macaroni, lemon juice, and salt; remove from heat.

Combine blue cheese and chives in a small bowl. Garnish each serving with blue cheese mixture.

Buffalo Chicken "Fries"

Ingredients

1/3 cup hot sauce (such as Frank's)
1/2 stick unsalted butter, melted
1 Tbsp. honey
1 lb. boneless, skinless chickenbreast halves, slice lengh-wise into 1/2 inch wide strips, seasoned with salt and pepper
1/3 cup all-purpose flour
1/4 cup vegetable oil, divided

Preparation

Whisk together hot sauce, butter, and honey in a large bowl.

Toss chicken strips with flour in a large resealable plastic bag until coated; shake off excess four.

Heat 2 Tbsp. oil inn a large saute pan over medium-high; add half the chicken strips, saute until browned, about 2 minutes per side, then transfer to hot sauce mixture and toss to coat. Repeat with remaining oil and chicken strips.

Do you have any examples of a great meal your honey cooked for you?

Inspiration board: a vintage garden bridal shower - Dairy Foods


I created this inspiration board for my friend Kristin's upcoming vintage/garden bridal shower. Kristin has 9 bridesmaids in her wedding and we are all working together to throw her an amazing shower. I can't wait!

Details:

- Flowers, flowers and more flowers: St. Paul and Minneapolis have awesome farmer's markets in the summer months with gorgeous and affordable wild flowers. We will likely use mason jars as vases.

- Vintage/floral tea cups and lacey tablecloths to incorporate into the decor

- Brunch food: quiche, mixed greens, scones, baguette and cheese, fruit, and other light bites

- Brunch cockatils: mimosas, bellinis and bloody mary's

- Dessert: cupcakes

Do you have any ideas that would be great for a vintage/garden bridal shower? I'd love to hear them!

{Photo credits: Better Homes and Gardens, Ruffled Blog, Style Me Pretty, Country Living}

Fruit Crumble Cake Recipes

There is one blog which I admire a lot since I start blogging is Technicolor Kitchen . The owner of the blog Patricia Scarpin from Brazil is such a talented chef and photographer. She makes everything look so delicious and beautiful. You just wanted to try out everything she posted at her blog. When I saw her Fruit Crumble Cake I knew I just have to make it right away. It turns out beautifully. The cake has a very nice fruity taste and I just love the crunchy crumble topping. I did some minor changes to the recipe and instead of 8” x 12” square pan, I used 8” x 8” pan, that is why the cake turn out a bit taller than hers and for the fruits I just used whatever fruits that I have in my fridge.

Ingredients:
Adapted from Technicolor Kitchen

3/4 cup/1 1/2 stick unsalted butter, softened
1 1/3 cups sugar
1 1/2 teaspoons vanilla extract
3 eggs
2 1/3 cups all purpose flour
2 teaspoons baking powder
pinch of salt
1/4 cup (60ml) whole milk
5 plums, stoned and thinly sliced
5 apricots, stoned and thinly sliced
1 tbsp sugar - for sprinkling

Crumble topping:

1/3 cup all purpose flour
1 ½ tablespoons caster sugar
2 ½ tablespoons (35g) cold unsalted butter, chopped

1. Preheat the oven to 180°C/350°F. Butter an 8” x 12” (I used 8” x 8” so the cake turns out much thicker than her) baking pan and line with baking paper – butter the paper as well.
2. Place the butter, sugar and vanilla in the bowl of an electric mixer and beat until light and creamy. Gradually add the eggs and beat well. Sift the flour and baking powder over the mixture, add the milk and beat in low speed until combined. Spoon the mixture onto prepared pan, arrange the fruit over the top and sprinkle with the extra sugar.
3. To make the crumble topping, place the flour, sugar and butter in a bowl and rub with your fingertips until fine crumbs form. Scatter over the fruit.
4. Bake for 50 minutes or until cooked when tested with a skewer.

Beautiful savory bites - Dairy Foods


I talk about sweets a lot here on Eat Drink Pretty but the truth is, if I had to choose between a cupcake or a plate of fries I would choose the fries any day. I am a huge salty/savory lover; french fries, burgers, chips, bacon, nachos, rice and soy sauce, buffalo chicken, I love it all.

These photos are just a little savory inspiration. How gorgeous and delicious do these little bites look? I would love to throw a party and serve (and eat, of course) each and every one.

How about you? Are you a bigger fan of sweet or savory?

{Photo credits: Style Me Pretty food/drink gallery}


Brides magazine - funny - Dairy Foods

I am giggling as I write this post because another one of my wedding photos (this time of my actual wedding) was published in the April issue of Brides magazine. The reason it's funny is that the guy I am dancing with in the photo (and looking like I am having quite a good time) is not my hubby! It's actually a former coworker who was dancing up a storm that night after having one too many cocktails.

Photo credits to Sewell Photography (Jennie is so awesome). A couple of our post wedding pictures also shot by Jennie were in the March issue of Brides. I can't wait for her to photograph the dessert table I am designing! Maybe some of those photos will get published, too :)


Spinach Loaf Recipes

This is something very similar to my Blueberry Cream Cheese Loaf but instead of sweet I made it into savory loaf. For the filling I just used whatever I can find in my fridge. As usual I used the Pillsbury bread stick dough. I tell you, this bread dough is really handy if you want to bake something quick.

Ingredients:

1 tube of Pillsbury bread sticks dough
4 oz of frozen chopped spinach – thawed and squeeze out the water
4 slices of ham – cut into cubes
2 tbsp of light mayo
3 tbsp of light cream cheese
1 tomato – cut into small cubes
1 shallot – slice thinly
1 egg yolk
½ cup of shredded cheese – any kind
Salt and pepper to taste

Egg wash

1 egg white – beaten

1. Preheat over to 350 degree F. In a bowl combined spinach, ham, cream cheese, mayo, tomato, shallot, egg yolk, salt and pepper. Mix really well and set it aside.
2. Remove breadstick dough from the tube, unroll it and separate the dough and you will have two rectangles. Join the dough up by placing both dough rectangles horizontally on a lightly greased baking sheet. Press the steam together (refer to pix 1)
3. Spread the filling onto the centre of the dough. Sprinkle some shredded cheese on top of the filling (pix 2) Separate the dough perforations up to the cheese mixture (You might need a scissors for this) slightly pull and stretch the dough strips.
4) Start from the top and bring and braid dough strip to cover the filling. Make sure to tuck and seal both ends of the loaf (pix 3)
5) Beat the egg white and brush it all over the loaf. Sprinkle the remaining shredded cheese on top. Bake for 25 minutes or until golden brown.

(pix 1)

(pix 2)

(pix 3)

Shortbread sandwich cookies - Dairy Foods

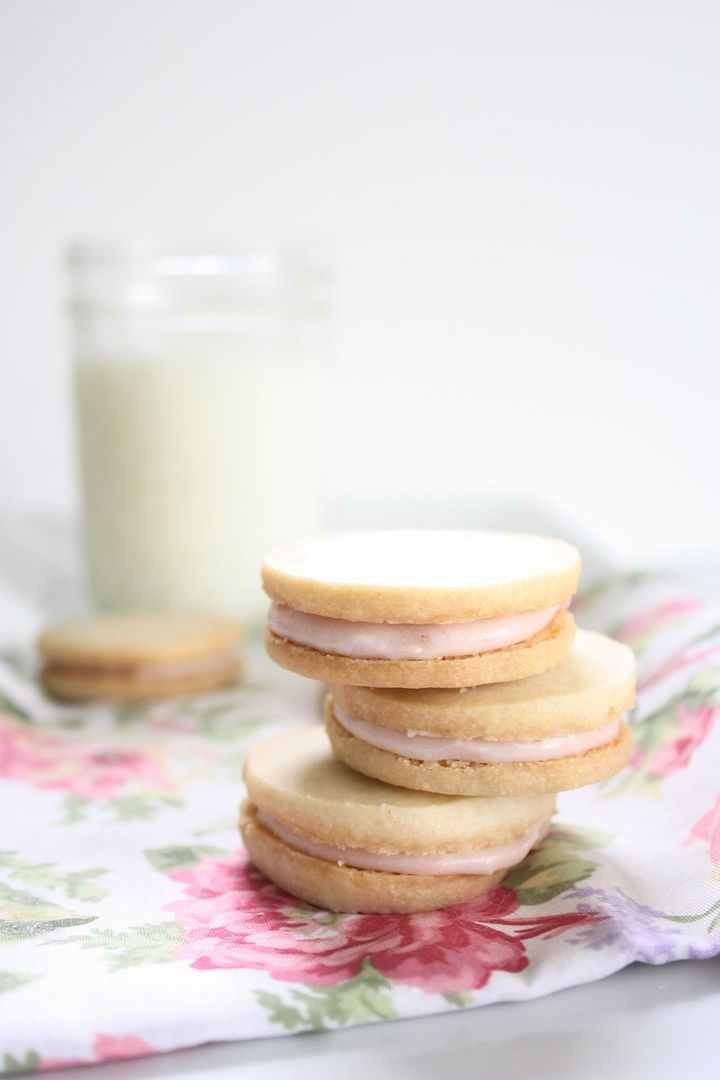
Aren't these shortbread sandwich cookies adorable? They are very simple, I used the shorbread cookie recipe from Fresh Home magazine minus the rosemary. The frosting is a cream cheese frosting with strawberry jam added to give it the pink tint. The frosting was a bit too sweet so next time I make these I may just add some food coloring for the color. Be sure to cut the cookies a bit thinner (since two cookies will be sandwiched together). They also only need to be in the oven for 9-10 minutes, since they are thinner.

You can expect to find these on the dessert table that I am designing in the next couple weeks!

Did you bake anything this weekend? Comment and share!!


Wasabi Mayo Shrimps Recipes

I just love this dish. It is quick and simple to prepare. The shrimps were fresh, succulent, crunchy and smothered with wasabi mayonnaise dressing. The wasabi gave a spicy kick to this dish.

Ingredients:

½ pound shrimps – peel and deveined
3 tbsp of corn flour
1 egg white
1 red chili – chopped
1 cup of cubes mango
Some chives – cut small

Dressing:

3 tbsp of mayo
1 tsp wasabi (more if you like it spicier)
1 tbsp of lemon juice
1 tsp of condensed milk

1. Marinate the shrimp with a bit of salt and pepper. In a mixing bowl, mix the flour and egg white together. If it is too thick add a couple tbsp of water. Add in the shrimps, mix well and fry it on high heat until lightly brown. Remove and drain the oil on paper towel.
2. Mix all the dressing ingredients together and toss it into the shrimps with chili, mango cubes and chives. Serve.

A blogiversary and an inspired project! - Dairy Foods

Today is Eat Drink Pretty's blogiversary! One year ago I wrote my first post about a Martha Stewart crab dip. Since then I have published 235 posts all about delicious recipes, pretty cupcakes, gorgeous real weddings and much more. I cherish this blog as a creative outlet, passion, hobby, escape and a place that has connected me to many amazing people. I thank each and every one of you who stop by, send sweet emails and leave comments. I hope to celebrate many more blogiversarys!

To celebrate I have a fun project underway. I am designing (with the help of some amazing vendors/sponsors) a dessert table that is 100% inspired by Eat Drink Pretty. The vision is to bring my blog to life by asking the question, "if Eat Drink Pretty was a dessert table, what would it look like?" The colors and overall style of the table are influenced by the blog design; lots of pinks and grays, a chandelier and rows of tasty pink treats. The majority of the desserts will be homemade and inspired by the many recipes I have tried over the past year. Remember these amazing strawberry cupcakes? They will be making an appearance on the table along with a bunch of other desserts. The photos above are providing inspiration for the table though the final product will be unique to Eat Drink Pretty.

I have partnered with six awesome vendors who are going to help bring this vision to life. The photo shoot is taking place within the next couple weeks and I am hoping to post in mid-May.

Sewell Photography will be photographing the table. I know, without a doubt, that she will do an amazing job capturing all the details. Jennie is a wedding and lifestyle photographer located in MN. Her work has been published in local and national publications and she was named one of the top 3 best wedding photographers by Minnesota Bride Magazine. Be sure to check out her blog for all her recent work.

Jackie Just of Just Bloomed will be designing the floral arranagements. Jackie was one of the master-minds behind the gorgeous Candy Shop inspiration to reality feature on Style Me Pretty. She is also one of the most talented florists around and her beautiful work is often published.

Apres Party Rental is providing all the linens, backdrop, chandelier and a few other items. They have been great to work with and have an awesome showroom that showcases their huge selection of rental items.

I can't say enough good things about Erin from Hello Frosting. Her edible icing decals are absolutely gorgeous. Hello Frosting can customize most designs to suit a specific event theme (change colors and fonts) and she welcomes custom designs. I can't wait to show you the awesome design she came up with for the Eat Drink Pretty dessert table! Be sure to check out her Etsy site!

Lovely Scribbles is designing all the paper products and will be adding a special touch with her perfect calligraphy on all the dessert labels. Lovely Scribbles is a calligraphy business and Nikki also sells her intricate placecards on Etsy. Be sure to check out her blog with examples of her work.

And what would be a dessert table without a gorgeous centerpiece? I am super excited that Sweets Bakeshop is creating a 2-tier cake with a design inspired by Eat Drink Pretty. Sweets Bakeshop is a little gem located in St. Paul. Their cupcakes and macarons are as gorgeous as they are tasty and they are quickly gaining momentum in the wedding world.

As you can tell, I am beyond excited about this project. Thanks to all the vendors involved and most of all, thanks to Eat Drink Pretty readers who have truly given me something to celebrate today!!!

{Inspiration board photo credits: Country Living, Hostess Blog, Cannelle Et Vanille, Holy Sweet blog, Such Pretty Things}

Spring wedding inspiration - Dairy Foods

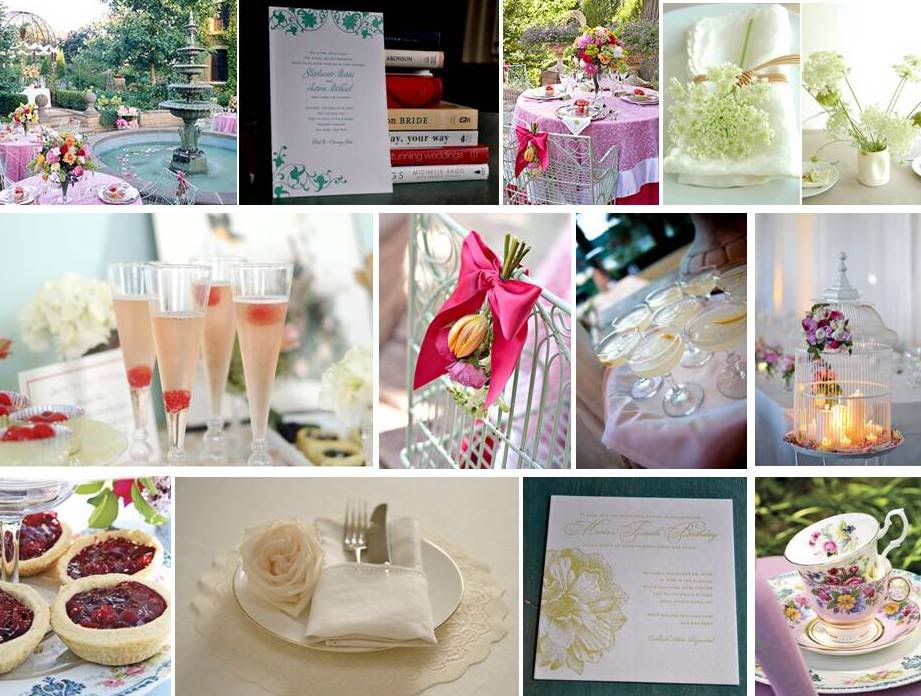
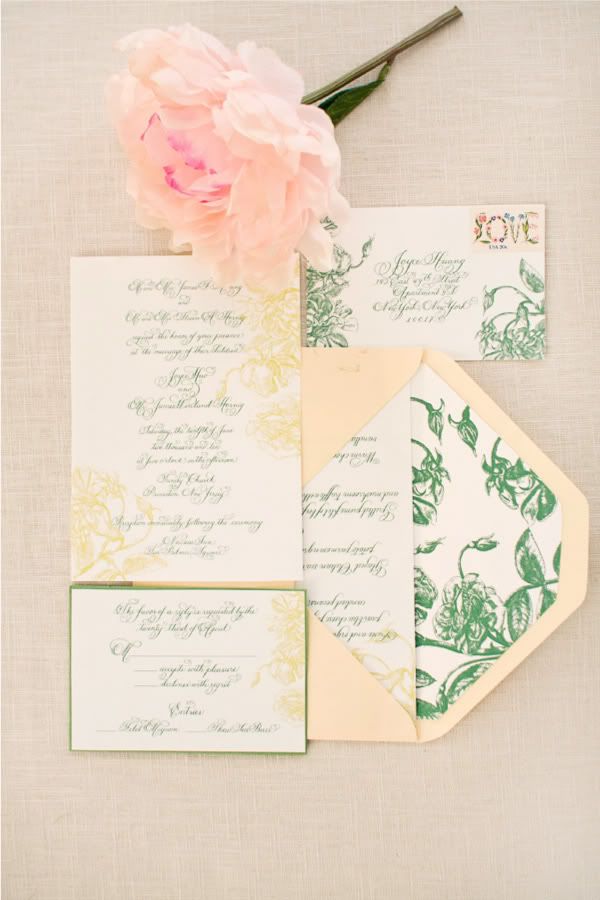
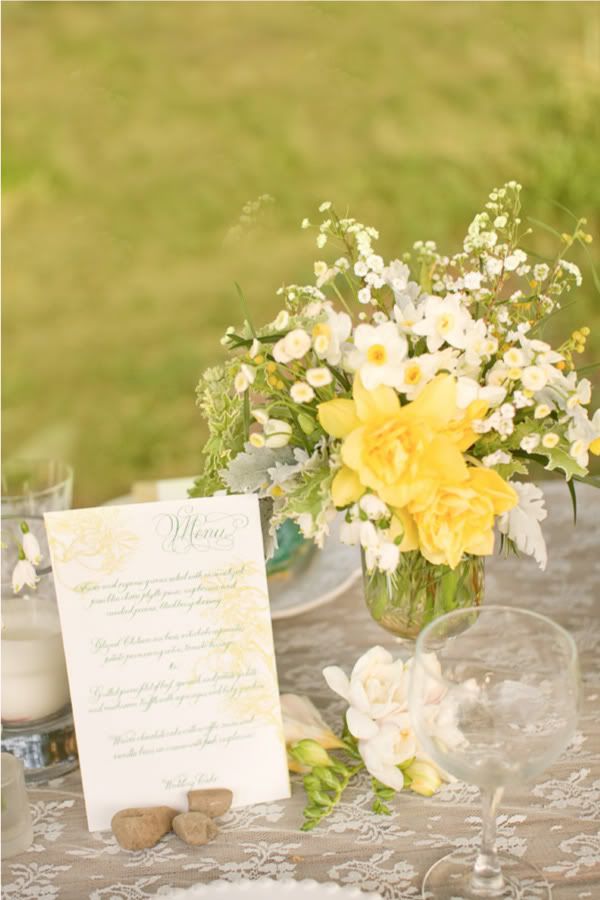
My two best friends are getting married this year so I am constantly talking/thinking about weddings, which as you know, I love. After a few conversations about weddings today with my two besties (chair covers vs. chiavari, caterer tastings, invitations, etc) I thought I'd write a post on gorgeous wedding inspiration that I've recently seen. And since the spring weather is so inspiring in MN lately, I chose this beautiful spring photo shoot created for Style Me Pretty.

I have been in love with inspiration to reality shoots on SMP ever since I participated in one a couple months ago (with a bunch of awesome vendors!!!). It's amazing to see what creative and talented photographers, florists and designers dream up.

And to any of you ladies that read my blog and are engaged, congratulations!!!! I'd love it if you left a comment with your wedding date and any details. I hope you are enjoying wedding planning!!!

{Photo credits: Steve Steinhardt via Style Me Pretty}


And in case you don't follow Eat Drink Pretty on Twitter or Facebook, you missed an announcement on a fun project I'm working on. Tomorrow is my blogiversary and I will have all the details then. Don't miss it!!!

Epok Epok Sayur/Vegetable Puffs Recipes

Epok epok sayur is a curry puff lookalike but instead of meat and potatoes this it is filled with vegetables like carrot, cabbage, onions, pepper, jicama etc. The filling of this epok epok is very similar to spring roll filling. I remember eating this when I was in school but I am not sure if anyone is selling this anymore. Unlike curry puffs, epok epok sayur is usually eaten with some chili sauce. This little morsel is just delightful for afternoon tea and it is perfect with a cup of teh tarik.

Ingredients for the dough:

380 gram flour
113 grm/1 stick cold butter – cut into small cubes
1 egg - beaten
½ tsp salt
100 + ml water

Ingredients for fillings:

1 piece chicken breast – thinly sliced (omit this if you want it to be vegetarian)
1 carrot – julienned
Half red pepper – julienned
1 small onion – thinly sliced
2 cups shredded cabbage
A handful of sugar snap peas – thinly sliced
2 cloves garlic - chopped

Seasoning:

1 tbsp of oyster sauce (omit this if you want it to be vegetarian)
3 tbsp of soy sauce
½ tsp pepper
½ tsp sugar
Salt to taste

1. To prepare the filling. Heat about 2 tbsp of oil in a wok, add in garlic and onions and stir fry until fragrant and lightly brown. Add in the meat; continue to stir until the meat changes color.
2. Add in the rest of the vegetables, all the seasonings and stir until well combined. Add in a bit water and cook until the vegetable is a bit soft. Do not overcook. Taste and check seasoning.
3. Remove and let it cool.
4. For the pastry, place the flour in a large bowl, add in salt. Mix well. Put in the cold butter and with your fingers rub the butter and flour together until it resembles coarse bread crumbs.
5. Add in the egg, mix again and then add in the water. A little at a time until the dough comes together. Continue to knead until smooth. Cover and let the dough rest for 15 min.
6. Roll out the dough thinly, cut into circle, put some filling in the center and fold the pastry into half circle shape and crimp the edges.
7. Heat up some oil, deep fry in hot oil until golden brown. Drain the oil and served.

Guest post: rani in the kitchen part 6 - potato poha - Dairy Foods


Today's guest post is part 6 in the series "Rani in the Kitchen", written by my friend Amy. Click here for parts 1-5.
________________________________________________

I love today's recipe, Potato Poha. This is second part of my last post, which was a breakfast post. This recipe is great because it is SUPER simple and quick. You can eat this recipe anytime during the day: breakfast, lunch, dinner, or even as a snack! I make this recipe often instead of basmati rice, or as I did last week, to go nicely as a type of Indian hash brown recipe with curried scrambled eggs!

So lets start with the basics. Poha is a flattened rice that is eaten in many parts of India. You can read about it here.

Poha is often used as a snack-type food, but can also be a nice change from plain basmati rice. I often make the recipe below with peanuts instead of potatoes as a mid-afternoon snack for Jay and I.

One small catch to this recipe: I'm fairly certain poha is only available at Indian supermarkets. So in order to make this, you'll almost certainly have to venture out and get some. But hey, what's cooking without a little culinary adventure? So Google an Indian grocery store near you! I usually buy the Swad Thick Poha. I know others that buy the Thin Poha, but I really like this kind the best:

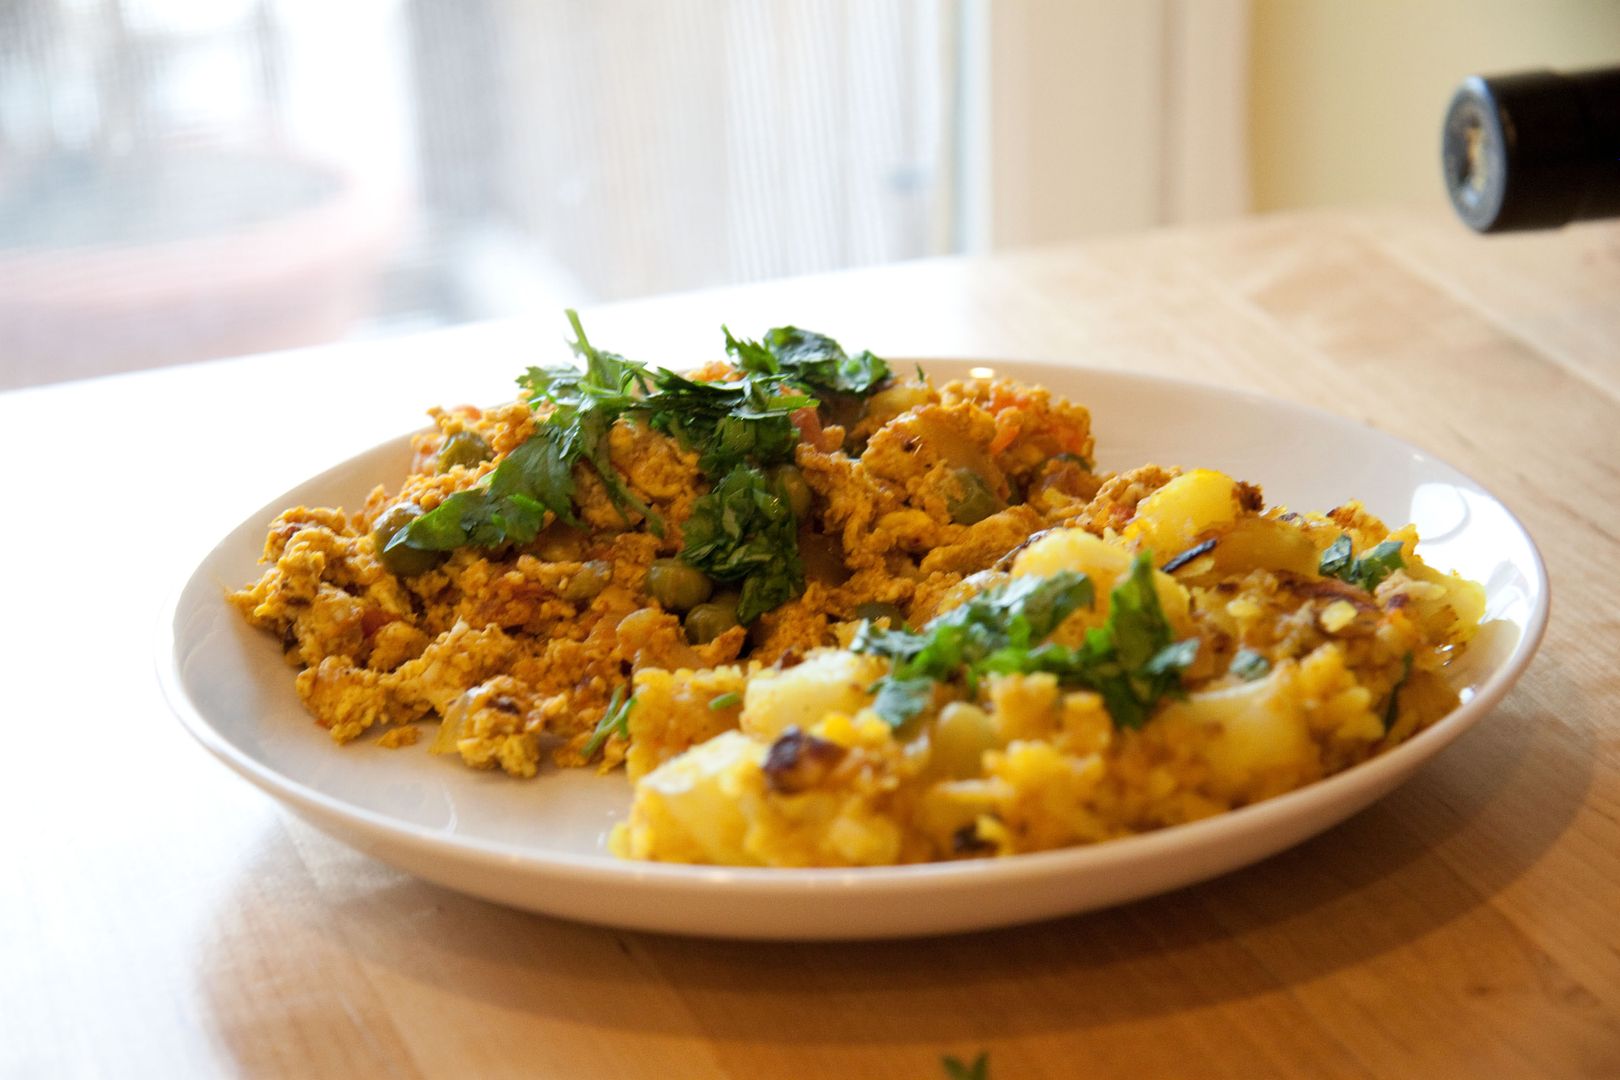
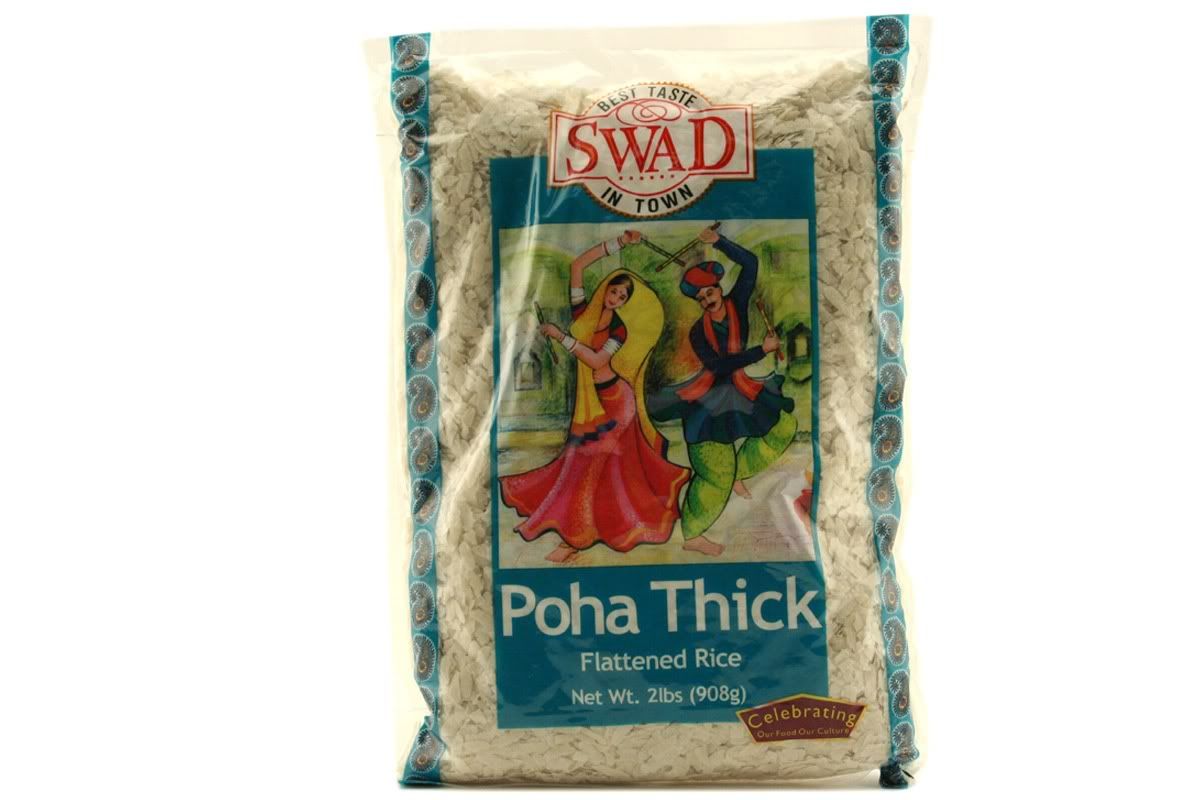
After you get your Poha, you should hvae the rest of the ingrediants handy. The recipe takes about 20 minutes to make.

Aloo Poha (Potato Poha)

Ingredients

1 large russet potato
2-3 handfuls of thick poha
11/2 Tablespoon of Turmeric
1 Tablespoon of black or brown mustard seeks
1 medium onion
1-2 green chilies or 1 teaspoon for red chili powder
1 inch grated ginger (or 1 1/2 tablespoon ginger paste)
1 teaspoon lemon juice
2-3 Tablespoons vegetable or canola oil
Handful of cilantro
Salt to taste

Preparation

1. Peel the potato, cut into bite size cubes, and boil until you can put a fork through it, but not mushy (6-8 minutes). Drain the water.
2. While the potato is boiling, put two to three handfuls of poha in a colander. Rinse the poha well, drain, and sprinkle with turmeric and salt and set aside.
3. Thinly slice and chop your onion
4. Thinly slice and chop your chiles
5. Heat oil on medium high heat in a non-stick pan. (I've found this recipe always cooks better in a non-stick pan)
6. Once the oil is hot, add the mustard seeds. They should quickly start to pop, then add the onion, and chiles. Saute for 1-2 minutes.
7. Add the potatoes and ginger (and chile powder if you did not use chiles above). Saute until the potatoes start to fry and brown.
8. Add your damp poha mixture into the pan and sautee for 1-2 minutes.
9. When the poha is well coated with the sides and starts to dry out, turn off pan.
10. Sprinkle lemon juice, salt, and freshly chopped cilantro into the mixture.

Feel free to add peas or peanuts into this mixture as well. Poha is sort of like fried rice, you can make it a million different ways!

Spring tea - Dairy Foods


The ladies in my family went to Spring tea yesterday at my mom's church. It was the second annual tea we've had together and it was a great time. I don't know exactly why, but spring tea is inspiring. Maybe it's spending time with the awesome women in my family, being in a room with 65 other women of all ages or the English chef that prepared the best tea treats. Whatever it is, I will always think fondly of tea time.

Here is the menu from the "Spring Tea"

Tea sandwiches (chicken cashew and cucumber triangles)
Cream scones with clotted cream and lemon curd
Trifle and cake
Tea, tea and more tea

The photos are not great due to the glaring fluorescent lighting.


Hummingbird Cake Recipes

The Hummingbird cake is a true Southern cake and it is beautifully moist and delicious. This is one of my favorite cakes as it kind of reminds me of carrot cake which has all my favorite ingredients like bananas, pineapple and nuts in it. The cream cheese frosting gives an extra tangy sweetness to it. It is still a bit of mystery on where its usual name came from. But there are many theories about the origin of this cakes name.

Some say this cake earned its name because people will hum with delight while eating this cake. Another theory is that it's as sweet as the sugared water used to attract the Hummingbird. Whatever it may be, I do know one thing for sure is that the cake is so good and if you are looking for a cake to bake this would be the one.

Ingredients:

1 ¾ cups flour
1 tsp baking powder
½ tsp baking soda
¼ tsp salt
½ tsp ground cinnamon
3 large eggs
¾ cup firmly packed dark brown sugar
½ cup vegetable oil
1 ½ cups mashed bananas
½ cup crushed pineapple
1/4 cup pineapple juice
2/3 cup chopped pecans or walnuts

Cream Cheese Frosting:

1 cup icing sugar
3 tbsp butter
80 grm cream cheese
1 tbsp lemon juice

1. Pre-heat oven to 350 degree F. Grease and line an 8” square or round baking pan with parchment paper.
2. Sift all the dry ingredients and set it aside. In another mixing bowl, combined eggs, brown sugar, oil, bananas, pineapple juice and crushed pineapple. Stir all the ingredients together until well mix.
3. Add in the sifted ingredients into the eggs mixture. Mix until combined and lastly add in the nuts. Pour the mixture into prepare baking pan and bake in the oven for an hour or until golden brown and the skewer inserted into the centre of the cake comes out clean.
4. Remove the cake from the oven; let the cake cool completely on a wire rack before spreading on the cheese frosting.
5. For the cream cheese frosting, put all the ingredients in a mixer and beat until smooth and creamy. Spread it on the cake.